DIAMOND RING REPAIR CHECK
CHECK YOUR DIAMOND RING AFTER REPAIRS FOR THESE THINGS
This post contains affiliate links. If you use these links to buy something I may earn a commission. Thanks! As an Amazon Associate I also earn from qualifying purchases.

Do yourself a favor…
The next time you pick up your ring from repair (especially if it’s an engagement ring), stop!
Do not walk out that door.
The last thing you want to do is to pay and leave.
Don’t do it!
Why?
Because you need to check the repairs that were done, but more importantly, you also need to check the rest of the ring and the diamond for damage.
You see, so much can happen to your stones during the course of a repair. It could get accidentally chipped. It could be accidentally swapped out during setting. It could be purposefully stolen. The diamond or gemstones could be loose (you could lose them in a week).
The point is, they are your rings. You need to double check them before you leave the store. It’s your responsibility.
Because if you find out later that something is wrong, it’s very difficult to prove, or to point blame.
So check them before you walk out the door.
This is what you need to Look for…
1) Looseness:
Have the jeweler, or salesperson, double check that the stones are tight (or do it yourself).
You can easily tell if the stones are tight, by seeing if they move when you tap them. Use jeweler’s tweezers and gently touch the top of the diamonds, in the center, on the sides, all around to see if they tilt or rock in the heads or mounting.
You can also see if the stones spin in the prongs. Use your fingernail or the tweezers and gently (don’t force it) see if the stone rotates. They shouldn’t!
Stones should always be tight and not move. A stone that is loose or moves can chip or crack from the friction of the movement and prongs. They could also fall out of the mounting if hit hard enough.
Loose stones are actually pretty common and jewelers generally check them for tightness before they finish the repair, but sometimes they are rushed and get missed. It happens.
Just double check them, under a microscope or a 10x jeweler’s loupe (which makes it easier to see them) and you’ll be in good shape.

2) Lifted prongs:
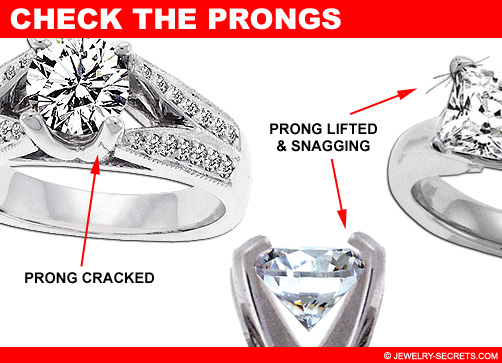
Make sure that the prongs on your stones are flush to the top of the stone, or crown. You don’t want them to be raised or lifted above the gems where there’s a gap beneath them.
Any kind of gap makes it easy for hair and fibers to get caught underneath, and for them to get snagged or pulled, or even snapped off.
If you see that your prongs are lifted or jagged, ask the jeweler to fix them.
P.S. Also, look to see if the prongs have cracks in them. Sometimes this can get missed as well. And the last thing you want is to catch it on your sweater, bust it off, and lose your stone.
3) Chips:
This is a BIGGIE!
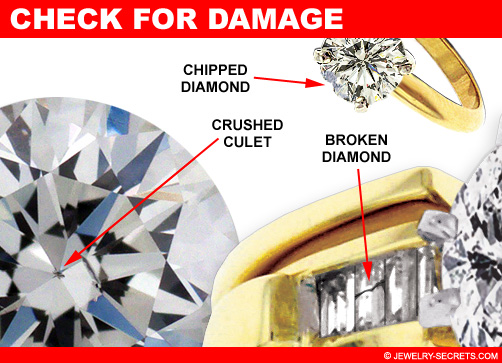
Always check your stone for chips or breaks when you get it back from repair. Even if it’s just a simple sizing job.
Jewelers can accidentally damage the stones with their pliers, saws, hammers or vice. Check all around the edge of the diamond (the girdle) under 10x magnification (again, a microscope works best for this), and look at the diamond from all sides.
Make sure the edges aren’t chipped (which would greatly affect the value and clarity of the stone), and check the culet (bottom center point of the diamond) as well. Sometimes culets get cracked or chipped during setting and can easily be missed.
If you don’t catch it now, before you leave the store, there’s not much you can do about it later. It’s your word against theirs, and there’s no way to prove who did it then.
4) Diamond plot:
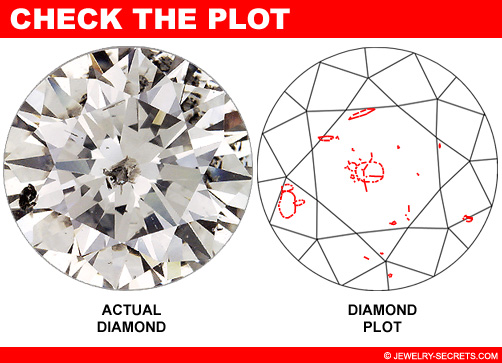
If your diamond is certified (please be certified by GIA), and comes with a fancy diamond plot, check the inclusions in your stone against the inclusions drawn on the report.
Make sure you got the right diamond back.
It has happened before where identical looking round stones were swapped out in the ultrasonic cleaner, and thankfully, they were caught by double checking the stones.
It can happen. We all make mistakes.
Plus, there are also the unscrupulous few who will want to steal your stone, and replace it with a lower quality diamond. Checking the diamond, the size, dimensions, and clarity under the scope can save you lots of grief in the future.
5) Diamond inscription:
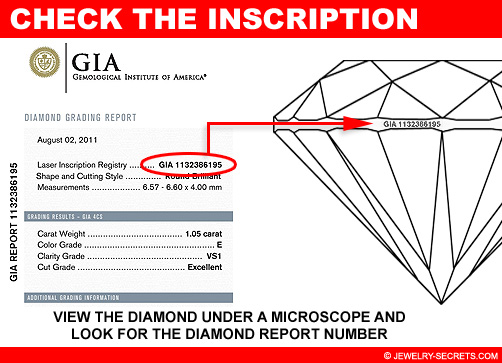
If your diamond is certified and laser inscribed, view that inscription under the microscope to make sure that it matches the inscription numbers on your diamond report (also called a certificate).
This makes it quite easy to identify your stone, and it gives you great piece of mind.
You can look at the inscription and say “YES! That’s my diamond!”
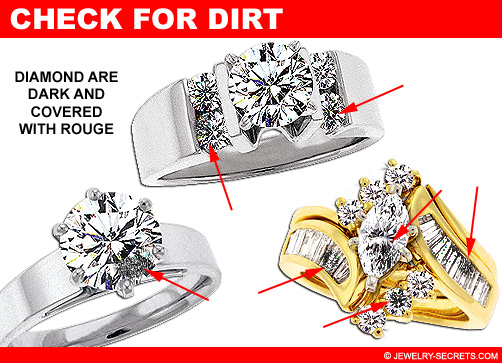
6) Dirt:
Sometimes when you get your rings and diamonds back from repair, they don’t look right. They won’t be sparkly and bright. Often they will look different, duller, and darker.
What’s wrong?
They’re probably still dirty.
You see, after your rings have been fixed, repaired, soldered and filed, they must then be polished and cleaned.
Jewelers use polishing rouge compound to make the metals reflective and shiny. The problem is, this rouge, which normally comes off looking black, coats the rings and stones all around. They then get dropped into the ultrasonic jewelry cleaner for the final step.
Sometimes though, the rouge does get trapped underneath the stones (especially channel set stones), or doesn’t sit long enough to come clean.
The result is soot or black spots/areas, that make your diamonds dark and lose sparkle.
The fix is simple. All the jeweler has to do is to clean them longer, better, or steam the stones (with a steam cleaner) to remove the rest of the debris and rouge.
That way your diamonds will shine again, look new, just like the day you bought them.
So there you go.
Six easy steps to check and double check that your diamonds are tight, secure, not damaged, authentic and clean.
A two minute check could save you thousands.
All you have to do once they hand you your diamond ring back from repair is say “Can I take a closer look please?” and point to their microscope.
Jewelers have no problems with this, in fact, it’s ideal and expected.
That way everyone is totally at ease and confident with the work done.
It makes everyone happy.
That way, everyone wins.
It’s well worth the look.
Wouldn’t you say?












Leave a comment