IDENTIFY YOUR DIAMOND IN 3 STEPS
LEARN HOW TO IDENTIFY YOUR DIAMOND IN 3 EASY WAYS
This post contains affiliate links. If you use these links to buy something I may earn a commission. Thanks! As an Amazon Associate I also earn from qualifying purchases.

“Was my Diamond Switched?”
That’s the question that plagues many people with engagement rings.
They often wonder if the jewelry store or jeweler has swapped out their stone for a lower quality stone that isn’t theirs.
Luckily, there are some very quick and efficient ways to tell if your stone has been exchanged…
So let’s look at these, since it’s something that every diamond owner should know.
1) Certified Laser Inscription
First off, let’s hope that you bought a certified diamond (GIA is the BEST), and let’s hope that the stone is Laser Inscribed (usually diamonds under 1.00 ct are).
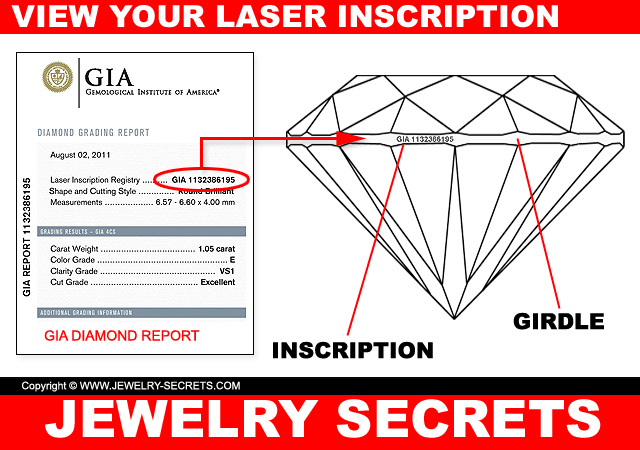
Laser Inscriptions are tiny Numbers or Letters that are etched onto the side of the diamond girdle, and those numbers are unique to your stone, will be there forever, and are easy to match up with the numbers on your diamond (use a inscription viewer, or 30x loupe (10x is what they use for grading, but 20 or 30x is best for viewing inscriptions) and you’ll see it pretty easily).
View these numbers when you drop your ring off at the jewelers, and view them again when you pick it back up, just to make sure it’s the same stone.
2) Memorize your Inclusions
Know your flaws!
Every diamond has flaws (99.9% of them), and every flaw is unique. Just like moles and freckles on a person, they all look different, are different colors, positions, angles, sizes, shapes…
No two are alike!
So if you view your diamond under a microscope, and memorize your flaws, then you’ll always be able to identify your stone.
You’ll know that at the 6 o’clock position (think of your diamond as a clock face for orientation), you have a black spot (or line, or cloud, or pin-point). That black spot has been in that diamond for a billion years. Meaning, it will never change, dissolve, shift, grown, shrink, or look any different from the day you bought it.
This also means, that if you view your inclusions, learn where they are and what they look like, you’ll be able to view your stone again, anytime in the future, and those flaws will be there, exactly as before (that’s if you get your stone back).
Another awesome thing to do…
Draw your flaws out!
Grab a sheet of paper and a pencil. Use the Microscope and PLOT your imperfections. As so…

That way you have a visual map of what they look like, and you can refer back to that map at anytime and identify your stone.
(P.S. Make sure your Diamond is CLEAN when you do this, otherwise you could be mapping dirt and crud on the surface of the stone!)
3) Certificate Plot
Something even easier than trying to memorize your flaws, or drawing them out, is to have the experts do it for you.
Certificate Companies like GIA, will often have a diamond plot (map) of the stone, showing exactly where the flaws are situated.
They’ll show the plot view from the top position and bottom. As seen here…

So all you have to do is to view that plot, and rotate your stone in the microscope to coincide with those flaws. Then you’ll be able to find them one by one and know that you got your diamond back.
It’s awesome protection and it keeps you from getting ripped off!
So there you go, those are the 3 BEST ways to prevent diamond switching, and it all comes down to one thing…
Knowing your Stone!
YOU, and only YOU, are responsible for keeping track of your diamond.
You have to be proactive and view your diamond when you drop it off at the jewelry store (don’t just hand it over and go). FORCE them to view it with you, so you both can see, locate, and find your flaws (which also means, take your diamond certificate with you, just don’t leave it there! That’s YOURS!)… And when you go back to pick up your repair, sizing, polishing, whatever…
VIEW YOUR STONE AGAIN!
Don’t just take it and run out the door….
NOPE!
Go back to the microscope (microscopes are easier for customers to use than a hand held loupe), find your flaws, and know that you have your stone back…
Safe and Secure
And you then have protected yourself, your diamond, but your pocket book as well.
And that’s how you identify your stone!
Cheers! :)











Leave a comment