CHECK YOUR PRONGS NOW!
8 EASY WAYS TO CHECK YOUR PRONGS FOR DAMAGE
This post contains affiliate links. If you use these links to buy something I may earn a commission. Thanks! As an Amazon Associate I also earn from qualifying purchases.
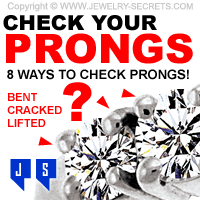
When was the last time you checked your prongs?
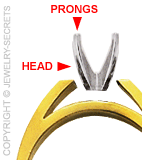 The funny thing is, a lot of people don’t even know what a prong is (let alone a head).
PRONG???
The prongs are those little, thin pieces of metal that bend up over your stone to hold it in place.
The head is all the prongs and base joined together as one (see image).
Some people call these things posts, but jewelers call them prongs or tips. On most rings, there are anywhere from 2-8 prongs per stone. If you have a lot of stones, you’ll have a lot of prongs.
And the more prongs you have, the more maintenance, repairing, retipping and rebuilding you’ll need in the future. Which means…
More money.
Damage has a way of happening. It’s just the normal life of a prong. They wear down, get snagged, erode, bend and even break off. There is no way around it.
So what can you do?
Preventive medicine:
Check your prongs often for signs of wear and tear. Checking them will allow you to detect any problems before they happen. It will allow you to get your prongs fixed before you end up losing a gemstone or an expensive diamond.
So how do you check a prong?
I’m happy you asked…
:) There are 8 easy ways to check your prongs. Most of these you can do right here, right now and they won’t cost you a penny.
Let’s begin…
1. The touch test:
Run your finger over your prongs. How do they feel? Can you feel them at all? Do they feel like little balls of gold (good) or do they feel smooth and flat (bad)?
When prongs wear down, they usually get flat on top. The gold wears away like tread on a tire (I say gold because most prongs are 14kt white gold). They get thin, flat and even sharp.
If you run your fingers over the prongs and they feel smooth, low or non-existent, then it’s probably time for a retip job. That’s where a jeweler will build up your prongs on top and make them durable again.
If you feel small, rounded nubs, or metal mounded up over the stone, that should mean that your prongs are thick and still in good condition.
If you don’t know what I’m talking about, go to a jewelry store. Ask to see an engagement ring and run your fingers over the brand new prongs. Feel the difference between new prongs and used prongs. This quick test will tell you whether your prongs are flat as a pancake or if they are still holding your stone in securely.
Some prongs wear down faster than others. The prongs on the outside of your ring will normally wear down the fastest. It all depends on how often you wear your ring and how much abuse your ring goes through.
2. The sweater test:
Look at your prongs. Do you see hairs, strings or fibers caught underneath them? Do your prongs snag or catch your clothing, gloves, hair or sweaters?
When prongs get low and worn, they get rough and jagged and tend to lift up off the stone. This tiny gap causes fine fibers to get trapped underneath the prongs.
In this condition it’s quite easy to snap your prongs right off your mounting. So if your prong is snagging… It’s time for rebuilding, retipping or pushing the prong flat up against the stone (burnishing).
Have a jeweler inspect them immediately. Otherwise, you’ll look down at your ring and your lovely diamond will be missing. That’s no fun.
3. Bent prongs:
Your prongs should be evenly spaced all the way around your diamond or gemstone. Take a moment to look at them. Are the gaps between your prongs the same distance apart?
Make sure one prong isn’t leaning to one side, bent over, curved or closer to one of the other prongs.
Prongs can get bent if hit too hard. Most of the time you won’t even realize you did this.
Bent prongs should be fixed a.s.a.p. Prongs are there to protect your diamond from loss and chipping. And if there’s a large gap in between your prongs, you could accidentally strike the edge of your diamond and crack it.
Check your prongs. Look for spacing and gaps and signs that they are curved. You don’t want to break your stone.
4. Loupe them:
Grab a 10x jeweler’s loupe, microscope, or magnifying glass and study your prongs. Look for signs of weakness like: lifted prongs (prongs that are straight up and not bent over your stone), prongs that have cracks or pits in the metal, prongs that are flat on top or pulled to the side.
Check them and see if there’s anything that looks odd, tarnished or worn.
Do this every other month or so, just to be safe. You need to stay on top of things.
Also check them if you happen to hit your ring hard. Prongs and mountings take a lot of abuse and checking them is free and easy. Don’t neglect this!
5. Shake them:
A lot of people give their rings the shake test. When prongs get weak and fragile they don’t hold stones very securely… And often you can hear this.
Put your ring up to your ear (make sure you take off your other rings, bracelets or watches), and gently shake it. Listen carefully for any slight jiggling sounds or rattling noises. This happens if your stones are loose in the head. You’ll hear them bouncing up against the prongs. Not good.
Some people are really good at hearing these small noises. I’m not. I’ve tried, but I can’t hear a thing.
The only thing I hear rattling is my brain. :)
6. The fingernail test:
Gently put the edge of your fingernail against the edge of the diamond and give it a little push or turn. Does the stone rotate easily? Twist? Spin in the mounting?
Don’t force it! You don’t want to actually loosen the stone because you tested it. Just see if it’s loose already and moves on it’s own.
A slight nudge or push will show you. If it moves, get it tightened.
7. The tap test:
Grab some tweezers. Gently tap on the top of the diamond. Tap one side of the stone, then the other side. See if it moves up or down.
For me, this is the best way for me to tell if a stone is loose. I hold the ring at just the right angle so light reflects off the surface of the stone (the table). Then I tap it back and forth, one side, then the other. If I see the light shifts or the stone tilts in any way, then I know it’s time for tightening.
8. Take it to a jeweler:
Any jewelry store can look at your ring, check your prongs, and tell you within seconds if it needs work or not.
Prices will vary greatly on getting prongs fixed. It could be a couple of bucks or it could be hundreds, it all depends on how many prongs you have, what needs to be done, and what gemstones you have (some gems have to be removed first in order to fix the prongs).
And when the prongs get so worn or flat that rebuilding them can’t be done… They’ll need to be replaced.
Which means, you’ll need a whole new head. They’ll remove your old head from the mounting and set in a brand new one. Keep in mind that this can get costly.
But if you keep up on them, it can usually save you a lot of money in the long run.
So check your prongs now.
Look for damage, flattening, bending, pits or cracks.
Because it’s much cheaper to get your prongs fixed now, than it is to replace a chipped or missing diamond later.
Cheers! :)











Leave a comment