HOW DIAMOND CLARITY IS GRADED
HOW THE EXPERTS GRADE THE CLARITY OF A DIAMOND
This post contains affiliate links. If you use these links to buy something I may earn a commission. Thanks! As an Amazon Associate I also earn from qualifying purchases.
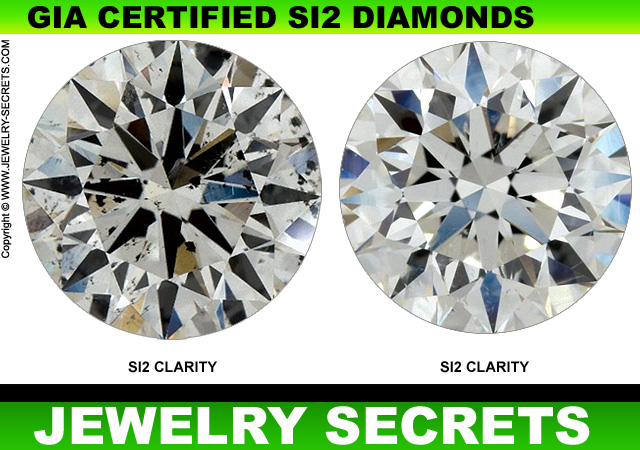
Did you ever notice how one SI2 Diamond could look totally Different than another?
One Diamond could be almost Perfectly Clean, except for a Few Lines in the Center of the Stone. While another could be so Full of Debris and Inclusions that it looks like a Treasure Map.
For Example:
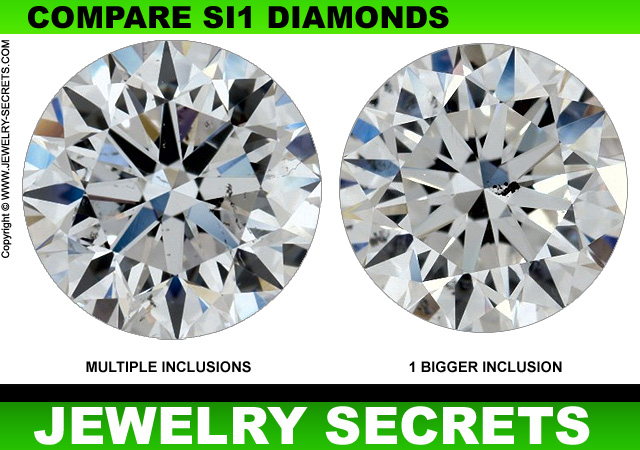
Take a Peek at these Two Diamonds shown below (And really, you could do this with ANY Clarity, I’m just using SI2 as an Easy Example).
Both Stones are SI2, but Appear much, much Different.
Crazy, isn’t it?
Now there may also be a Visual Difference due to Cut and Color, but there’s no Denying the Fact that one Diamond Appears way Cleaner!
It makes you think that one of the Diamonds is Graded WRONG!
Or even that they’re Graded by Different Grading Companies (which is usually the case).
But NOT here!
These are BOTH Graded by GIA (The Best in the Business).
So WHY the Visual Difference?
It’s because Grading is all based upon Opinion and Experience. Every Single Diamond has to be Graded Separately and Independently.
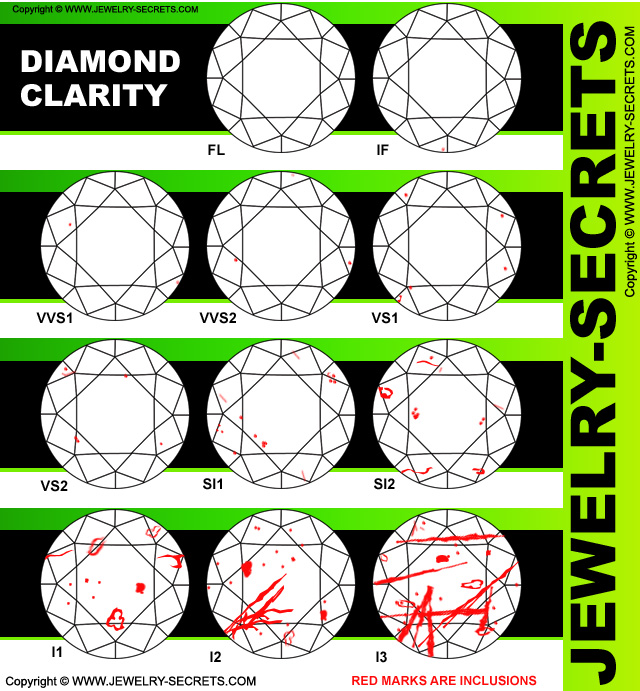
Familiarize yourself with the Diamond Clarity Chart below…
There are no Exact Specifications for Grading Clarity that makes it Cut and Dry. Nothing says that an SI2 Diamond MUST have at least 4 Inclusions or more.
It doesn’t Work that Way!
For there are a lot more things to consider when Grading Clarity.
So let’s take a look at what makes up the Clarity of a Diamond.
And it all comes down to the Actual Inclusions…
Inclusions are Graded by This:
- SIZE
- POSITION
- COLOR
- NUMBER
- RELIEF
- NATURE
Now let’s take a Closer look…
The Size of the Inclusion
The Size of the Flaws is Crucial to the Clarity of a Diamond. Because if it gets TOO BIG, then it can become Very Obvious without Magnification (using a Microscope or a 10x Jeweler’s Loupe), and that changes the Grade Entirely!
Eye-Visible Diamonds are I Clarity (Meaning INCLUDED).
Eye-Clean Diamonds on the other hand, are generally SI2 or Higher, meaning viewing the Stone with the Naked eye, no Magnification needed.
So the Size is a Big Selling Point to Determining the Right Grade.
The Position of the Flaw
Where the Imperfection Resides inside the Stone plays a Huge Role in the Diamond Clarity Grade. Most Grades have 2 Levels (Level 1 and Level 2, as in SI1 and SI2, or VS1 and VS2)
And for the Most Part, these Clarities are very Similar as far as Appearance goes. But usually, the Level 2 Stones will Feature Flaws that Fall Closer to the Center of the Stone. Where as Level 1 Flaws will normally Fall more towards the Outside of the Stone where they are Hidden under the Crown Facets better.
Compare VS1 Diamond Plots to VS2 Diamond Plots below to Understand more.
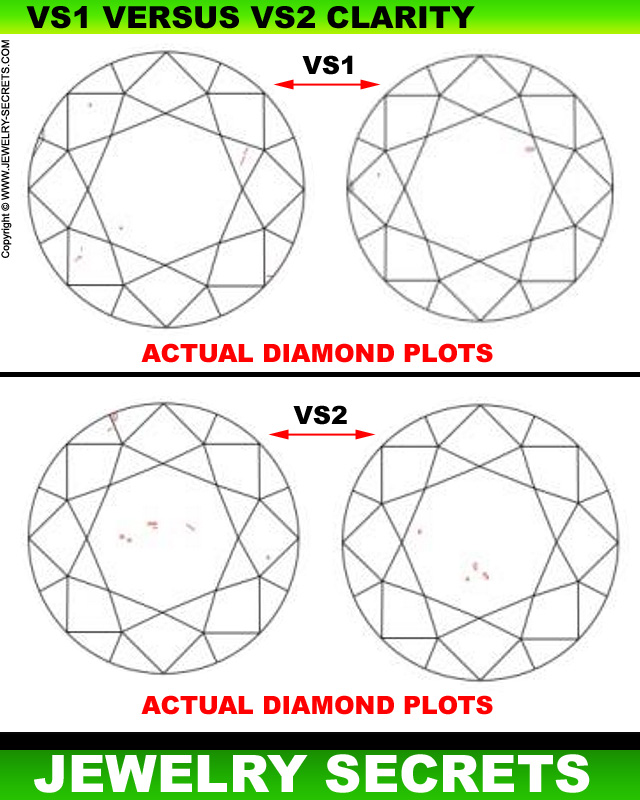
See how the Level 2 Diamonds have Inclusions more Center of the Stone?
The Color of the Inclusion
Many people don’t consider the Color of the Inclusion, until it’s too late.
For a “White” Inclusion is far better Visually, than a “Black” Inclusion that Sticks out like a Sore Thumb.
Both Diamonds below are I1 Clarity Stones…
Big Difference, eh?
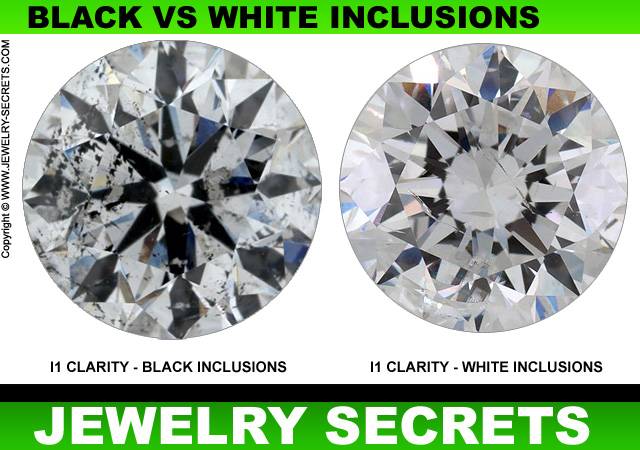
The Black Flaws are Obvious and Noticeable, and the White Flaws almost Disappear from View. :)
The Number of Inclusions
If you have ONE Flaws Dead Center (the WORST Possible Place for a Flaw), versus Tons of Smaller Flaws Spread Throughout the Diamond, it will look Much BETTER!
Everything in Nature has some sort of Birthmark or Identifying Characteristics about them. And the Amount of these Imperfections can really make a Huge Impact on the Look and Feel of the Stone.
Compare the Two SI1 Diamonds below…
See what I mean?
The Relief of the Inclusions
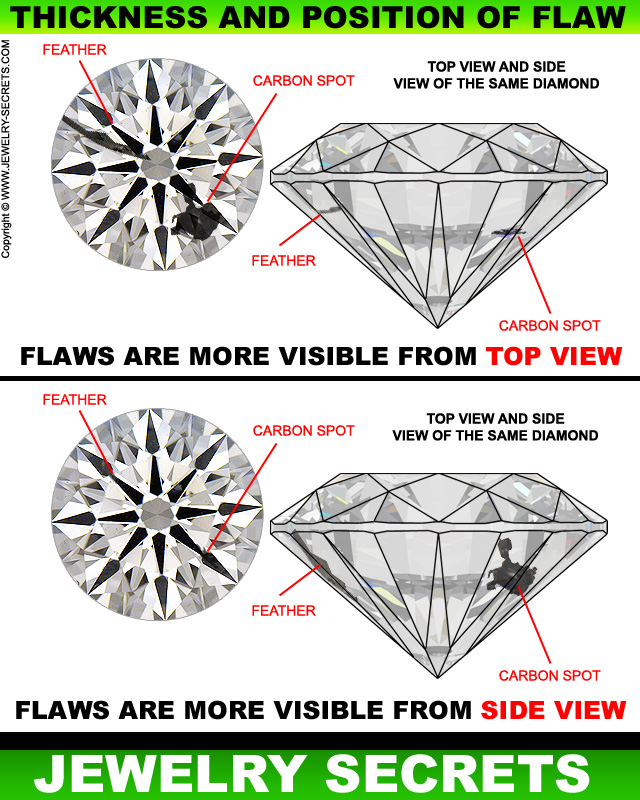
How Thick or Thin the Inclusion is, affects the Overall Beauty and Sparkle of the Stone. Some Inclusions are Lines, Pin-Points and Feathers… Others are Black Carbon Spots, Fractures and Cracks.
The Thickness of these Flaws can affect whether it’s Visible from a Top-View or Side-View, and whether the Flaws Stop Light from passing through the Stone, making it Sparkle Less!
Inclusions can Grow Horizontal or Vertical as well. Meaning, the Appearance of them from the Top View or Side View can be Drastically Different.
Take a Peek…
The Nature of the Flaw
What type of Inclusion is it?
A Small Dot?
Big SPOT?
A Fracture that Runs Longwise across the Stone?
They all change the Appearance of the Diamond, and the Opinion of the Grader.
There are two main types of Flaws that are Classified in Diamonds:
Internal Flaws
Internal Flaws are simply called “Inclusions“. They Reside INSIDE the Diamond.
External Flaws
External Flaws are on the Outside of the Stone, on the Surface. They are called “Blemishes“.
Now let’s look Closer at these Flaws…
“Inclusions” are Listed as these on a Diamond Report:
- Feathers – A Feather can be any type of break or crack in the stone. It’s called a Feather because it generally has a white appearance like a Feather. This can happen when the Diamond was growing, or if the Diamond is hit hard enough.
Feathers are normally of two different types: Cleavages and Fractures. - Cleavages – Cleavages are usually a break in a weak spot in the Diamond.
- Fractures – Fractures are many jagged breaks in different directions.
- Bearded Girdle – A Bearded Girdle is when the Diamond has small hairline breaks or fractures that surround the outside edge (the Girdle) of the Diamond. This can be caused when the Diamond was Cut, or it could be caused from years of wear and tear. A lot of older Diamonds and Estate Diamonds often have Bearded Girdles. It’s wise to scope them with a loupe before purchasing.
- Cavity – A Cavity is exactly what it sounds like; a hole in the Diamond usually caused by the Cutting Process (Kind of like pulling a knot out of a tree).
- Bruise – A Bruise is a small fracture in a Diamond usually caused by a quick, sharp blow.
- Chips – Chips are small chunks taken out of the Diamond, usually on the Crown or Girdle of the Diamond (the part of the Diamond that gets the most abuse). A Chip is caused by the right amount of force (a sudden strike), at just the right angle.
- Grain Lines – Grain Lines are like rings in a tree. Graining is irregular growth patterns that show up in the Diamond. Often they will look like ripples or waves in the stone.
- Cloud – A cloud is a foggy or cloudy area in the Diamond that’s caused by a lot of small inclusions all grouped together.
- Crystal – Crystals are other rocks or minerals that get embedded or trapped inside the Diamond when the Diamond was formed or brought to the surface of the earth.
The interesting thing about Crystals is that many Crystals found in a Diamond are actually pieces of Diamond that crystallized differently than the rest of the stone.
A lot of Crystals are dark and stand out like a sore thumb. These Crystals are commonly called Carbon Spots or Black Carbon Spots. They are a Diamond’s #1 Inclusion! - Laser Drill Hole – A Laser Drill Hole is a hole or tube left behind after a Diamond has been Laser Drilled to remove or burn out a sightly Inclusion.
- Pinpoint – A Pinpoint is a small, tiny crystal that looks like little, bitty dots in the stone.
“Blemishes” are Listed as these on a Diamond Report:
- Knot – A Knot is a Crystal that is exposed to the surface of the Diamond usually through the Cutting Process.
- Extra Facet – Extra Facets are usually Facets that are added to a Diamond to remove an Inclusion or Flaw that sits close to the outside or Girdle of the Diamond. Extra Facets are common and will help raise the Clarity Grade of the stone (because it removes the Flaw).
As long as the Extra Facet is small and around the Girdle (or underneath it), it won’t affect the beauty or value of a Diamond.. - Abrasion – An Abrasion is where the sharp knife edges of the Facets (where they meet) get worn down or rounded away through normal wear and tear or by the Cutting Process.
- Natural – A Natural is part of the original Diamond that didn’t get Cut or Polished like the rest of the stone. Usually Naturals are on the Diamond Girdle and often these Naturals contain a very cool triangular Growth Pattern called Trigons! :)
- Nick – A Nick is a small Chip taken out of the Girdle or Facet. Usually this is caused by hitting the Diamond with brute force or pressure.
- Polish Lines – Polish Lines are Lines that are left on the surface of the stone by irregular Polishing.
- Pit – A Pit is a small opening on the surface of the stone, usually looking like a pinpoint, but coming to the outside of the Diamond.
- Polish Marks – Polish Marks are burnt areas on the surface of the stone caused by too much Polishing.
- Rough Girdle – Rough Girdles are rough, grainy spots on the Girdle caused by bad polishing.
- Scratches – Scratches are scratches on the outside of the Diamond usually caused by the polisher or rubbing up against another Diamond.
- Grain Lines – Grain Lines are waves or ripples that appear on the Facets of the Diamond. This is usually caused by irregular growth patterns.
So you see, there’s a lot more to Grading Clarity than just a Clarity Chart and a 10x Microscope (What they use to Grade Diamonds with).
It’s Judging each and every Flaw, Size, Shape, Nature, Orientation, and Determining which Clarity Grade is Appropriate and Best for that Particular Diamond.
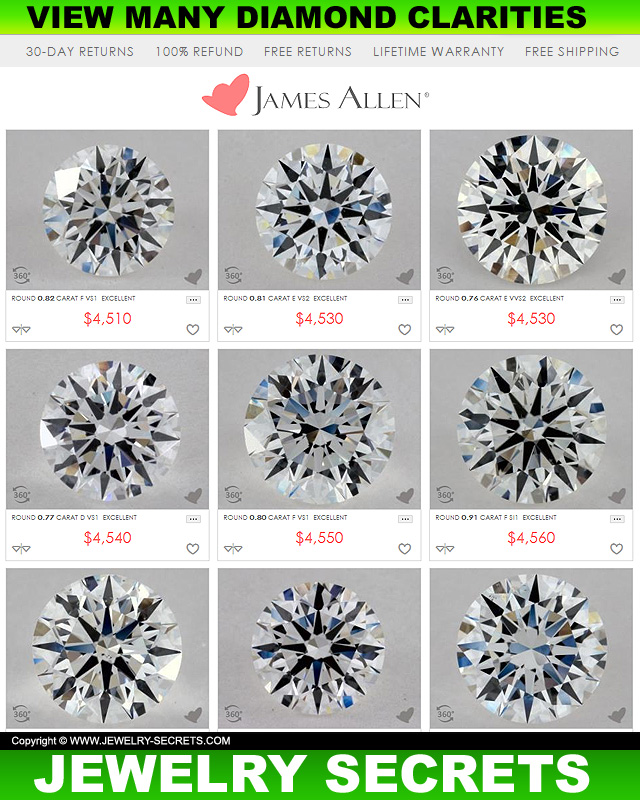
That’s why it’s Best to View Many, Many Diamonds of the Same Clarity Grade in order to Find the Best Diamond for YOU!
GIA all the Way Baby!
And, GIA is the ONLY Certificate (Diamond Report) that I truly Recommend Buying (AGS is a Close Second).
GIA is the BEST there is, and the Most Accurate Grade you can get.
And that my Friends, Brings TRUE Clarity!
Cheers! :)








Outstanding!! You definitely know everything there is to know about diamonds! And everything else jewelry related of course – but this post is a WOW! (To quote you!)
OK then I have a question for you. What is it about these two stones over at James Allen that separate them by so much money? I’m talking about over $1,700?
They are both Cushion cut (my fave), F VVS2, triple excellent, no fluorescence, GIA certified, etc.
One weighs 1.01 and the other one is a 1.02. Now, how can one tiny point make so much difference? It can’t, so it must be something else. Even the table and percentages aren’t too different, but they are some. And the more expensive one has a really thick girdle, compared to the other. Is that better here? I know you’ve said for round brilliant cuts, a really thick girdle isn’t too desirable, nor a terribly thin one either because they chip so easily.
Here’s the less expensive one and a heck of a deal at $4,880!
1.01 Carat, F Color, VVS2 Clarity, Cushion Cut Diamond
(Note that’s a mobile URL – I’m always on my smartphone. Or you can probably just use the SKU to find it ;-)
Here’s the more expensive one, at $6,650 (by one point and $1,770!)
1.02 Carat, F Color, VVS2 Clarity, Cushion Cut Diamond
So, what’s your expert opinion?
Excellent find Shari. I’d have to say Certificate Date. It looks like the more Expensive one was Certified 4 years ago, and the Cheaper one was just last year (has it been sitting in inventory that long?) The more Expensive one is also Laser Inscribed, which does up the price a bit. But I’d quess that the stones were bought at different times, years apart, when the Diamond markets were different. The Cheaper one (funny calling a VVS2, F Cheaper) looks way better to me. It has more Sparkle. The more Expensive one looks Darker in the middle. Buy the Cheaper! It’s a Win-Win! :)
Wow! That’s great! Now I have one more piece of information to look at when deciding on which is the better buy – certificate date! Very cool!
And I absolutely agree on the sparkle factor! The less expensive diamond certainly did strike me has having more pizzaz and more “eye candy” factor than the bigger bucks stone, which indeed did look darker in the center.
And I can’t imagine them having a diamond sitting in their inventory for FOUR years! Could it have been certified before they got it? (I’m not looking at it right now, so I don’t know who requested the cert.)
But I agree with you on that less expensive stone being a much better buy, and if I had an extra few thousand dollars just lying around waiting go be spent on something frivolous, THAT would be right where I would put it. That stone just knocks my socks off!! Golly, some lucky person is going to end up with a spectacular stone!! And Valentines Day is right around the corner!! I bet it won’t last much longer!
Not only is it important to look at the certificate date, but it’s more important to look closer at the stone as well. Because if a stone has an older grading date, that means, that the stone was probably bought, sold, or traded before. Meaning, it’s been worn and upgraded. And it could likely even have been damaged or chipped in the process. An older certificate (because it wasn’t chipped at the time it was graded) wouldn’t reflect the current state it’s in now. So a more current date is always wise. I’m not saying that this stone is chipped, I’m sure they checked it out good to make sure it’s in tip-top perfect shape, but if you buy it from a local jeweler who doesn’t double check, you could be asking for trouble. :)
Richard – I bet you wouldn’t be the least bit surprised to hear that BOTH diamonds have sold, would you? I had a feeling Valentine’s Day would probably do it. Or maybe it happened to be two lucky ladies’ birthdays, or one of each? Who knows? But in any case, two lucky ladies are likely now each sporting a gorgeous cushion cut diamond ring on their ring fingers!