20″ PHOTO LIGHT TENT STUDIO FOR JEWELRY?
REVIEW: PORTABLE LIGHTING STUDIO FOR JEWELRY AND COLLECTABLES
This post contains affiliate links. If you use these links to buy something I may earn a commission. Thanks! As an Amazon Associate I also earn from qualifying purchases.
Up for review:
A photographic lighting studio for jewelry and collectables.
Digital concepts has a portable 20 inch tabletop photo studio that is self-contained and lightweight. This table top studio that I reviewed is pretty inexpensive too, which is a bonus.
The box says that it’s great for online auctions, school projects, catalog images and more.
But is it?
I wanted to know how it worked for jewelry and other items. After all, photographing jewelry is probably one of the hardest objects to photo. Jewelry is small, shiny, reflective and metallic. Not an easy task for any photographer.
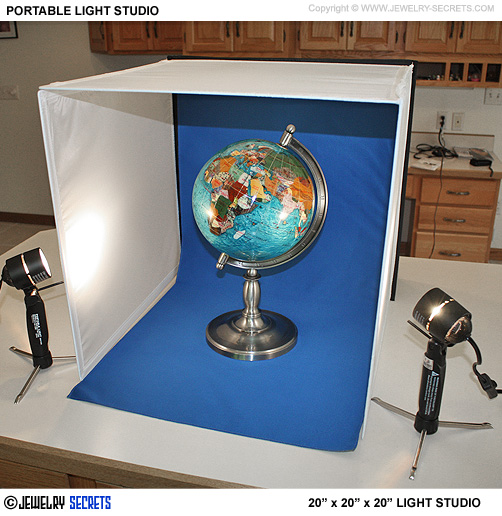
The dimensions of this studio are 20″ x 20″ x 20″, so it’s large enough to photo most items… Like this 16″ gemstone globe.
Features:
The features listed say:
- Easy to Setup
- Includes 2 High Output Lights with Retractable Legs
- 2 Colored Backgrounds for Contrast
- Mini Tripod
- Nylon Diffuser Screen for Balanced Lighting
The box also states: Get the perfect photo every time.
That’s a pretty big claim.
It goes on to say: Ideal for jewelry, electronics, collectables and more.
The box shows that it has a built in carry case (which is actually pretty awesome).
It also talks about the lamps: The high output lights are 35 watt lamps and provide even color temperature and clarity.
Plus, the tripod is 9″ and extends to 17″ with a tilt head.
That’s what the box says. Sounds pretty cool…
Let’s check it out…
I open the box:
The contents of the lighting studio box are simple…
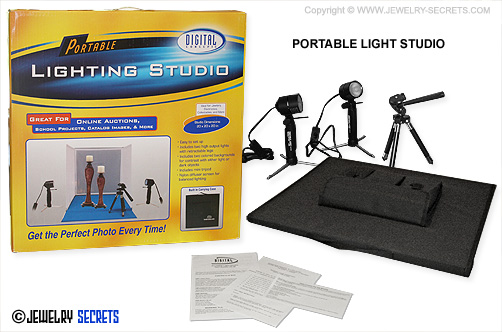
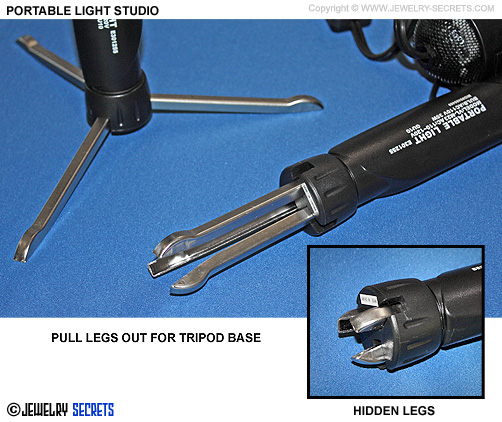
You get the carrying case with the mesh panels (specially woven, heat resistant, nylon fiber, mesh diffusers) attached and ready to go. The case has 3 pouches on one side. The pouches contain the mini tripod and the 2 lights. The lights are very cool. They have retractable legs that you just pull out to open up. I love it (they look alien).
You also get an instruction booklet, a warranty slip, and a safety sheet for the lamps.
I said to myself “I don’t need any instructions” and proceeded to set the light box up.
It was so simple to put together. It seals with 2 velcro tabs. You can’t get any easier than that. You open up the case, unfold the mesh panels and hook the velcro tabs. See photos below of me opening the box…
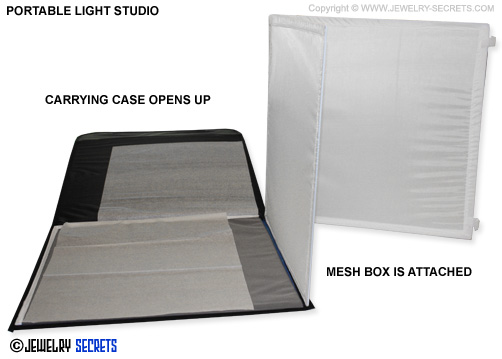
It really was a piece of cake.
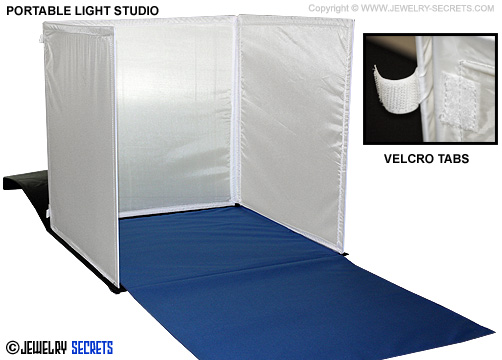
It takes about 2 seconds to fold it open and attach.
Light box complete.
But I’m lost…
I was a little taken back because the mesh panels are attached to the carrying case. I didn’t know whether to fold the back of the case up and hook it on the top somehow, or to leave it lay behind the box…???
I looked at the pictures on the box. They show the light box looking one way on the cover (like the picture above), but then the back of the box shows it upside down with the black case on the roof. Hmmm….
I finally give in and pull out the instruction booklet to see which way the box is supposed to go. There are no pictures. :(
The instruction booklet is useless:
The booklet offers very little help whatsoever. In fact, I found it to be frustrating and wrong.
Under the title of “Assembling the light box“, it states that there are 3 semi-opaque fiber-mesh squares. 2 are attached to the carrying case, the 3rd is not connected to the unit and can be velcroed to the top to form a roof???
WHAT?
That’s completely untrue. All 3 pieces are attached and cannot be removed. Who writes these instructions? I think they were wrote for a completely different light studio.
It gets worse…
The instructions have another section: “Setting up your lighting“.
It states: Set up your light box using a 3-point lighting system…
The instructions tell you to use 3 lamps but it only gives you 2???
That’s not fair.
I ditched the booklet. It was confusing and got me nowhere.
I figured it out on my own.
The background:
The Blue/Gray dual sided background was removable (by a velcro strip).
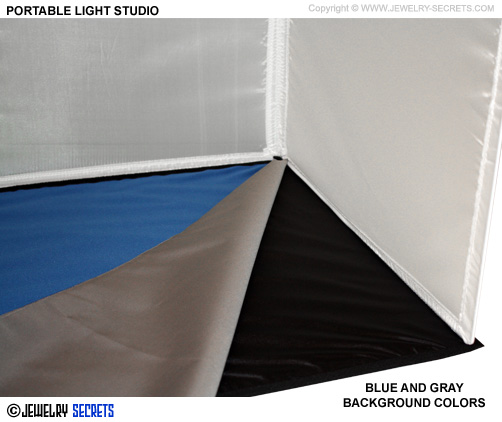
It’s made up of a non-reflective polyester fabric. The backdrop hooks to the bottom of the box as shown in the photo above.
Different configurations:
I experimented with the light box. I tried every configuration possible when taking photos. I left the black case flat to allow more light in like this…
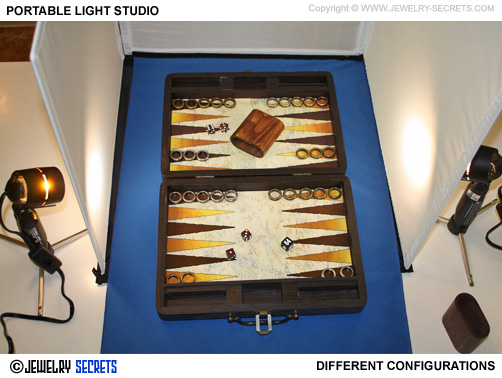
I flipped the black case up to darken the background…
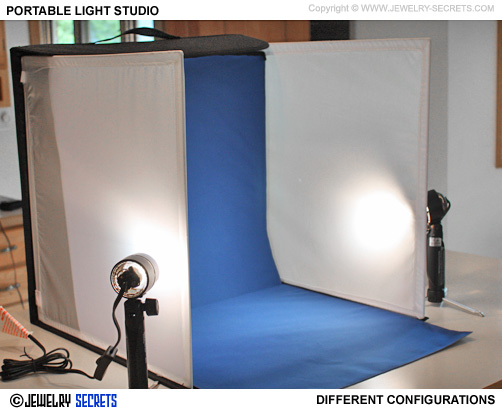
I turned the box up with the white mesh panels on the sides and on the top to diffuse light (which in my opinion works the best)…
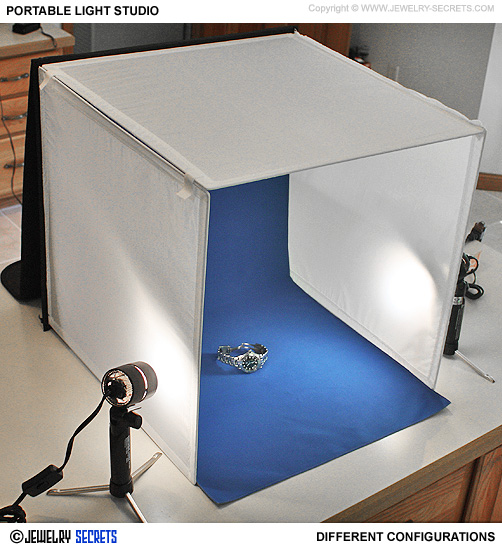
I flipped the portable light studio upside down so the black case formed a roof…
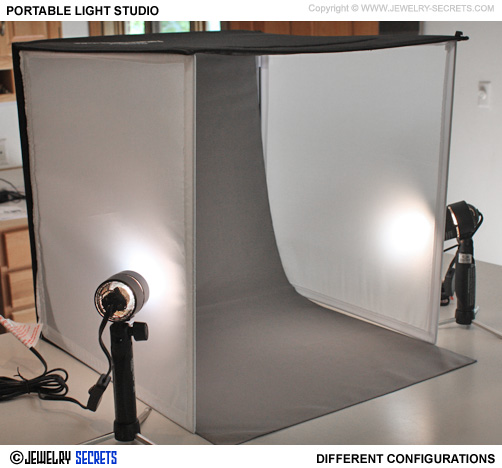
I used different backgrounds. I moved the lamps around. I shifted the tripod and camera angles. I found the entire setup to be very versatile. I came to the conclusion that there is no right or wrong way to use this. Every item you photo could require a different setup or configuration. This light studio does it all.
The mini tripod scares me!
The mini tripod (9″) was very light weight and flimsy. I’m sure it would be great for small cameras, but my camera is not small and not lightweight. I bumped the tripod plenty of times moving the items around in the box and just about knocked the tripod over. Thankfully I caught my camera in time. That would not have been nice.
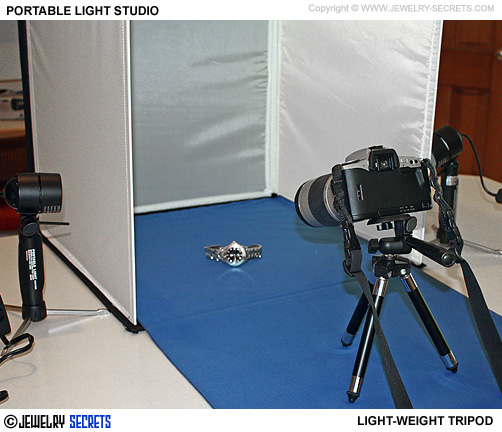
Note:
The camera in these pictures is not the camera I used to photograph the items with. My real camera is photographing this camera. Get it? I used this camera just to show you how small the tripod is with a nice mid-range camera attached. It’s pretty weak.
The camera that I used is a Canon Rebel and I would have been pretty mad if I broke it because of this tripod. What’s even scarier is when the tripod is fully extended…
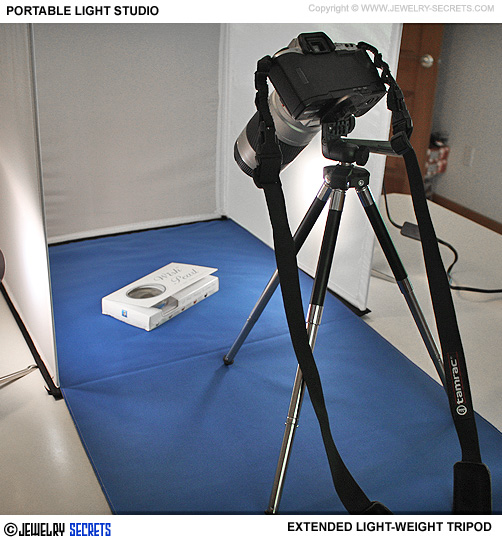
That’s like an accident waiting to happen. I bumped that even more.
I finally couldn’t take their mimi tripod and held my camera (with a shoulder strap of course) for the rest of the photo shoot. I would advise you do the same unless your camera is really lightweight and small, use your own tripod, or if you need to use a timer or a slower shutter speed.
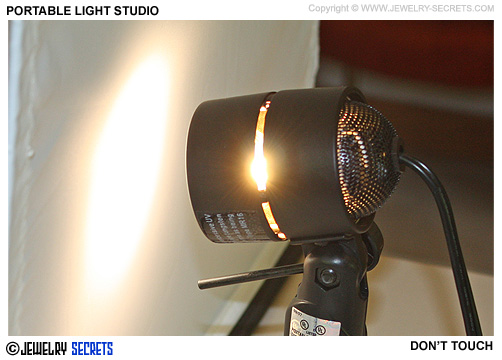
The lights are HOT!!!
Be careful of the lamps. There are plenty of warnings everywhere, even big stickers on the power cords, but that doesn’t help you much when you have to move the lights around to get them in the best possible position.
Twice I hit my hand on the casing and let me tell you, it smarts.
The lamps do have a little bar that sticks out that allows you to tilt the lamps up or down, but those get hot as well. Proceed with caution..
The safety sheet says:
- Don’t Touch
- Don’t Put your Hands Close to the Light
- Keep away from Flammable Objects
- Use only 35 Watt Bulbs
- Don’t Look Directly at the Bulbs
In other words:
It’s HOT! You Burn!
The camera I use
I photographed the jewelry and collectables shown here using my Canon Rebel XSi. I love this camera. Anybody who wants to get more into photography or wants to take great photos needs to look at a mid-ranged digital camera. I highly recommend Canon.
The lens I used is EFS 18-55mm AF/MF with a built in stabilizer.
I left the settings on fully automatic, which also meant… It used the built in flash in every photo (hence the shadows). Normally I would shut the flash off and use a slower shutter speed to photograph smaller objects, but I felt most people are not professional photographers (neither am I) and will probably just use the default settings on their camera… Especially for taking pictures for auctions on eBay.
How do the photos look?
Now we get to the good part…
Let’s compare…
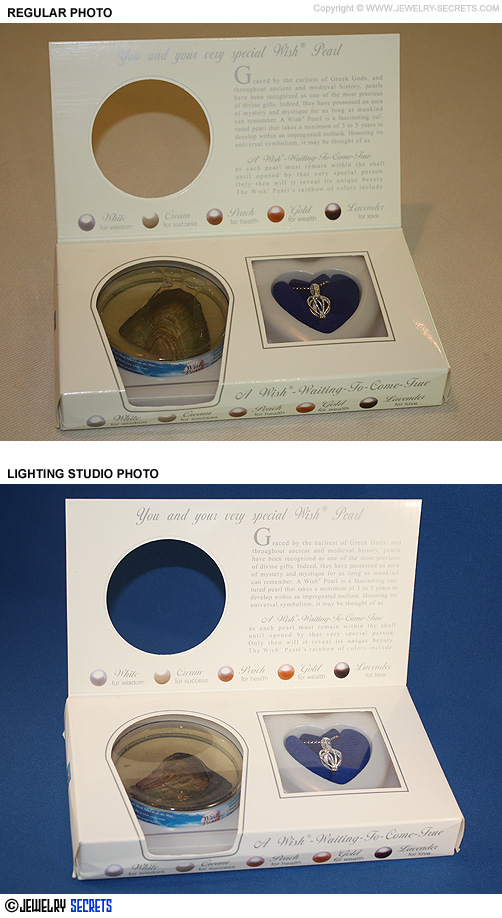
One photo is taken in normal lighting, with no light box (regular photo), and the other photo is taken in the studio light box. Compare for yourself:
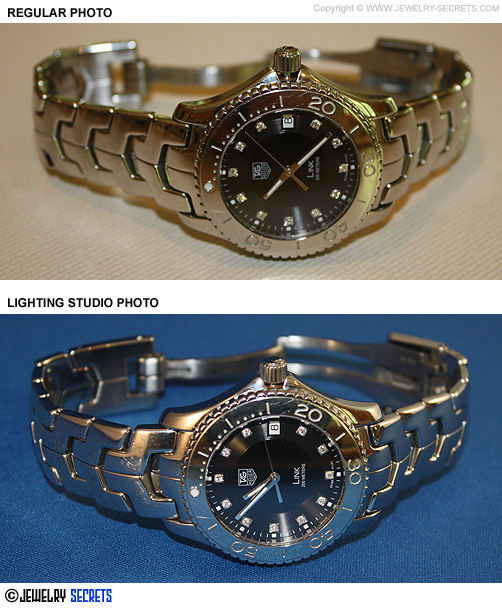
Note that these photos are not color or light enhanced in Photoshop in anyway. I only sized, cropped and sharpened both the before and after photos to fit this page. They are the real deal.
Here’s the gemstone globe before and after photo:
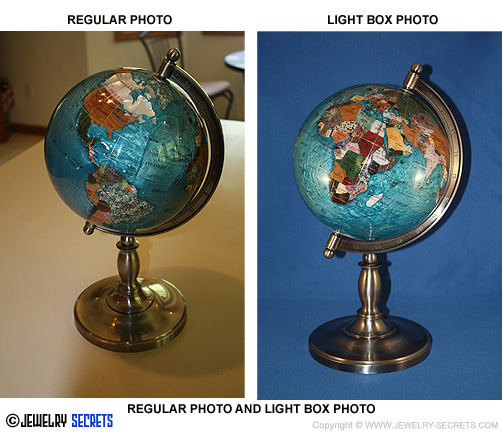
One thing you may notice is this:
With better lighting, you not only get better details, more accurate colors, but everything is much sharper and precise. Lighting makes all the difference in the world.
Now, me being a graphic designer would then still take these photos one step further. I would bring these images into Photoshop (what I use) and tweak them. For example, I would bring the photo of the gemstone globe into Photoshop and adjust the shadows and highlights. Plus, I would also remove the yellow hue caused by my kitchen lights.
Take a look at what Photoshop did to the photo…
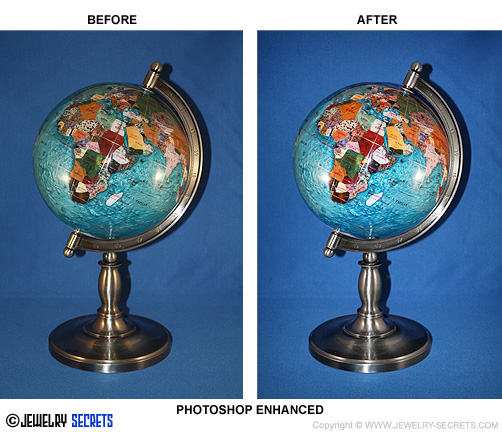
Impressive, eh?
The bottom line:
All in all, I found the portable light studio to be great and I loved the fact that it was portable and easy to carry (barely over 5 lbs).
I liked the fact that the box was big enough that you could photo not only large items but small items as well.
Just make sure you Clear off your Kitchen Table for the set up.
But, it takes a lot of space.
Especially if you have the back of the case laying flat. Not to mention, you’ll still need room for the lamps, extension cords, and tripod.
I will also say that if I had better lighting overhead, I probably could have gotten more awesome photos. But, there’s no doubt that the before and after shots here are a world of difference. With experiment and time, I’m sure I could do better.
Cameras and equipment will vary, so will your results. They could be better or worse than mine. Pictures are only as good as the camera and the photographer.
The light studio does exactly what it says:
Just don’t read the manual!
Move the lights around, play with the backgrounds, adjust your camera for different angles. The more photos you take, the better your odds at getting some great shots. Hopefully you own and use a digital camera so you can take hundreds of photos like I do and not have to worry about processing or film.
For home use, being portable, easy to set up, tear down, and carry… I’d say this is the perfect solution.
Your photos will look better. As far as the claim “Get the perfect photo every time“… I’d say that’s stretching the truth a bit. “Get a photo every time” is more like it.
My advice:
Use a better tripod. Especially if you have a heavy expensive camera. And stay away from those lamps (keep your kids safe).
Pros:
- Light Weight Case – 5 lbs
- Easy to Set up – only takes Seconds
- Easy to Carry and Store
- Lights and Tripod are packed away in the Case
- Dual Colored Backgrounds – Blue and Gray
- Versatile Configurations
- Photograph both Big and Small Objects
- Under $100
- Lifetime Warranty
Cons:
- Instructions are Vague and Wrong – No pictures.
- Mini Tripod is only Meant for Small Cameras
If you want to step up your game, and your sales, look at getting this portable light studio (or one similar). Your photos will look better and sell better. Plus, this light box only costs $45.99, you can’t beat that for a portable, fold up, carrying light studio.
I think it’s a winner.
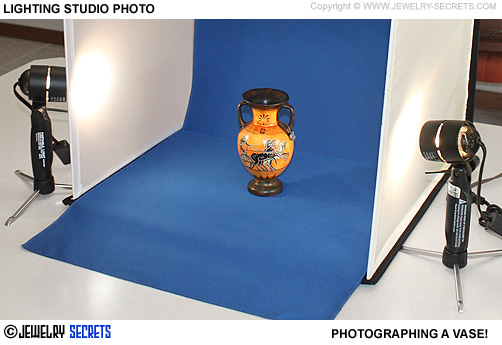
Now that’s a great looking vase.
Wouldn’t you say?
That’s a vase that will sell.
eBay, here I come…
Cheers! :)







Leave a comment