WHAT IS A DIAMOND PLOT?
LEARNING, EXPLORING & EXPLAINING THE PLOT OF A DIAMOND
This post contains affiliate links. If you use these links to buy something I may earn a commission. Thanks! As an Amazon Associate I also earn from qualifying purchases.
“A PLOT???”
When salespeople from jewelry stores tell customers that they can identify their diamond by the “plot“, most customers get a glazed-over look.
Some nod.
Even though they might get that a plot is like a fingerprint of a diamond, and that each and every fingerprint or plot is unique, they still don’t fully understand what a plot is, and they surely don’t understand the really big issue at heart…
How to read one.
Knowing what a diamond plot is and transferring that into usable, meaningful data, can help you decide whether or not to purchase a diamond.
It’s that good.
Rule of thumb:
The less inclusions or marks drawn on the plot, the better.
Less marks means less flaws, higher clarity, higher quality, and higher value (also more expensive).
So what is a plot?
A plot is a view (usually there are two of them, top-down, and bottom view), or diagram of your diamond with the inclusions (both visible and microscopic) shown on it.
That’s the gist of a plot.
It’s like a drawing of your fingerprint with all the lines, curves and indentations.
It’s the flaws of a diamond mapped out.
Every diamond (unless you have a flawless stone) has inclusions in them. These inclusions are either visible to the bare eye (you can look at your diamond and actually see the black spots, lines or clouds), or they are only visible under 10x magnification (using a microscope or a 10x jeweler’s loupe).
It really is like identifying people. We all have moles, birthmarks, freckles, red spots, wrinkles and scars that identify us. You could look at millions of people and compare all those marks and never find two people that are alike.
That’s just like diamonds.
Unique in nature. And nature is far from perfect.
That’s one reason why grading diamonds is so difficult. There is not an exact defining line that separates one clarity group from another. How many inclusions can a clarity have? How big must the flaws be? How visible?
It makes grading diamonds interesting and a matter of opinion.
Usually a diamond is graded by at least 3 experts before a final grade is given to that diamond. Even though the inclusions in that diamond remain the same, the expert’s opinions on the grade may vary slightly. It’s not an exact science.
So what does a plot look like?
Let’s dive in and see what a real diamond plot looks like to understand more…
Keep in mind that the only time you’ll ever see an actual plot of a diamond is if you buy a certified diamond that has the plot drawn right on the report (and the report will actually show 2 plots (as mentioned above); one with a top-down view like the one show below, and another from the bottom-up view – where the culet faces towards you).
Some certificates (called Dossier) are smaller reports and don’t show you the plot of a diamond. These smaller certificates will only have the details listed but won’t show you where the inclusions lay.
But a great thing about the Dossier reports is that almost all of them are laser-inscribed diamonds.
That’s a huge perk.
A diamond plot:
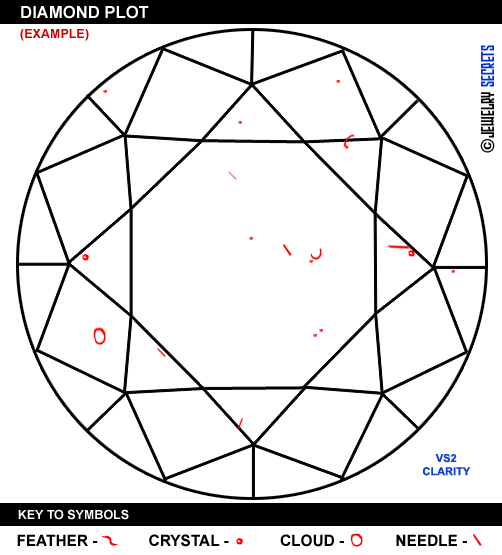
In the diagram above you can see a bunch of marks like feathers, crystals, clouds and needles. They’re very cool to see.
But a plot will also show things like: pinpoints, cracks, breaks, fractures, cleavage lines, bearding, growth lines, grain lines, cavities, knots, scratches, nicks, pits, abrasions, extra facets, naturals, and trigons.
Whew!
Now we learn the really cool stuff… What to do with it.
When you look at the diamond plot you may think to yourself “I can understand that.”
But the true test comes when you then look at that real diamond under a microscope.
Surprise! It looks nothing like the plot.
Looking at a 2D line drawing of a diamond with inclusions, and looking at a real stone with inclusions are total opposites.
A plot is flat and looks straight down into a diamond. Looking into a 3D object is more difficult to judge and navigate. It will even take you awhile just to get used to the microscope (remember science class in 6th grade?)
What do most people see?
Most people will only see about half of the lines, dots and marks listed on any given plot.
Squint your eyes and look at the plot again.
That’s pretty much what an untrained eye will see. It takes the inclusions down to about 6 or 7 marks (6 or 7 with this particular diamond shown which is rated a VS2 clarity – Different diamonds and clarities will have more or less flaws.)
Focal point:
And it even gets more fun because even though you are looking at the diamond under a microscope… What focal length are you using?
Are you focused at the top of the diamond, the middle, or the bottom of the diamond?
Moving the lens (focus knobs) up and down will bring different parts of the diamond into view. That’s when you will see some inclusions appear and others disappear as you move around the stone (even more so in larger carat weights).
A side view:
Plus, some inclusions are almost impossible to see unless you view the diamond from the side.
A top-down view can hide flaws because of the facets and blinding sparkle, but a side-view brings it all into clarity.
It makes inclusions easier to spot.
The point is, you have to look at the diamond from all views.
Rotate the diamond, adjust the focal length and turn it over to really see all the imperfections and flaws a diamond may have.
Plus a mark that looks like a skinny, little line from the top-view could actually be a deep, dark, wide inclusion when viewed from the side.
You must scope it well.
What’s the really really fun part of viewing diamond plots?
Trying to match up those marks.
(Matching the inclusions on the plot, to the inclusions in the stone will also verify that the diamond report you’re looking at belongs to that exact diamond you’re scoping.)
Keep in mind that you may have to rotate or turn the diamond until the spots lineup. Which means, trying to find a black mark at the 6 o’clock position may actually be rotated in the microscope and resting at the 12 spot instead.
Rotate the stone:
So the first thing you must do is to make sure, is that you have the diamond rotated correctly.
Rotate it with tweezers (don’t touch the diamond, you don’t want your oily fingerprints on it) so it matches the view on the plot shown (the salesperson should be able to do this easily).
Scope the diamond:
Scope the diamond from the top of the diamond, which is the table, all the way down to the bottom of the diamond, which is the pavilion (do so by turning the microscope knobs slowly and moving the lens up or down.)
See if you can find all those pinpoints, marks and lines described on your diamond report.
Looking at a plot and understanding a diamond’s fingerprint may seem odd and difficult at first. But when you learn to pick out a few of those inclusions and start to spot them, it will get easier and easier with practice.
Viewing marks, patterns, characteristics, imperfections and blemishes (marks on the outside of the diamond) is an awesome experience. You simply have not looked at a diamond until you have looked at one under a microscope or a 10x jeweler’s loupe. That’s when the true beauty of a diamond is shown.
Compare clarity:
Do note that to truly appreciate nature and diamonds, you must view similar clarities as well. compare two VS2 clarity diamonds side by side. See the differences between them. Some will have more inclusions than others.
Compare VS to SI clarity, and SI to I clarity. See how the inclusions get bigger the lower in clarity you go. It’s not only eye-opening, but it will help you decide which diamond to buy.
Once you see those marks and inclusions in your diamond, once you can match up those flaws, you will always be able to identify your diamond.
Prevent diamond switching:
If a jeweler were to switch your diamond out for a lower clarity, you could microscope the stone before you leave the store, look for those permanent marks and know whether or not it’s your diamond (do take the certificate with you).
If those marks are different, moved, larger or smaller than what’s shown on the plot, then it’s not your diamond!!!
Inclusions don’t ever change.
Those inclusions have been in there for over a billion years. They are constant and never changing.
You can scope your diamond 80 years from now and your diamond will look identical to what it does today (assuming you didn’t chip or break it – and your diamond is perfectly clean).
When should you scope it?
I would recommend that you get into the habit of scoping your diamond every single time you have your rings repaired (sizings, new prongs, shanks, anything) or even just cleaned and polished.
Scope it!
Look for your unique lines, marks and spots.
The plot is there to show you where to look. Learn to read it. It only takes a couple of minutes to scope the stone and to view your plot.
But those couple of minutes will give you peace of mind. You’ll know that you got your diamond back and you’ll also make sure that the jeweler didn’t accidentally chip your stone in the process (it happens). It’s wise to catch it immediately.
I would always advise you to scope your diamond when it’s clean versus when it’s dirty as well. Dirt, dust and debris will make your diamond look like it has tons and tons of flaws. Scope it perfectly clean so you can see what’s really inside.
So what are you waiting for?
Go to your local jeweler today…
Have them show you some certified diamonds and look at the plot (or head on over to James Allen and see them yourself right now).
Study it.
Scope it.
Enjoy it.
It’s a whole new world.
P.S. Also read my post: Learn how to read a diamond report.
Cheers! :)













Leave a comment