

CUSTOM DESIGN FROM START TO FINISH
SEE THE CUSTOM DESIGN PROCESS AND LEARN STEP BY STEP
This post contains affiliate links. If you use these links to buy something I may earn a commission. Thanks! As an Amazon Associate I also earn from qualifying purchases.

Custom design is the cream of the crop…
After all, most jewelry is created this way.
You can’t get any better than custom, especially when you’re repurposing gemstones or diamonds that you already own (and especially if these gems are sentimental; handed down by your parents, or grandparents).
So what is this custom process?
Let’s go step by step…
1) Coming up with a design
This is usually done with a jeweler who can draw out an image, or use a program like Autocad to show your ideals and concepts come to fruition.
Sometimes it’s done with photos, catalogs, pieces of pre-made jewelry that you like in the showcases (“I want these prongs, this basket, the patterning on this ring…”) You decide on the amount of diamonds or gemstones to use (your own, or ones supplied), and then these get incorporated into the overall styling and drawing. The jeweler will listen to your thoughts, give advice, and conceive a ring (or pendant, earrings, bracelet…) to your liking.
Often whatever they’re designing will be dictated by the size of the stones requested (ten pointers, one carat…) The mounting will fit around the millimeters used. This can limit the overall look, balance and flow of the ring (say you have 49 diamonds and wanted to use them all…), but that’s something you’d have to decide as the ring comes to life.

Once you’ve finally arrived on a mutual design, the next step is to guesstimate price. The jeweler will guess at the amount of gold, platinum, or silver needed, the amount of hours needed to create the wax, the labor required to cast the piece with all the necessary parts, and so forth. This questimation could be more or less, but it’s a ballpark figure. Usually they would also require 20% down (or more) to get the work started.
Now the fun begins…
2) Wax carving
Most custom design pieces are carved by hand. But nowadays, some people have moved into the digital world and use sophisticated computer programs to design the piece, along with utilizing a 3D Printer to carve the ring. Either way works, and the end process is the same; to get a wax of the ring. This can take days or weeks depending on the intricacy of the piece.
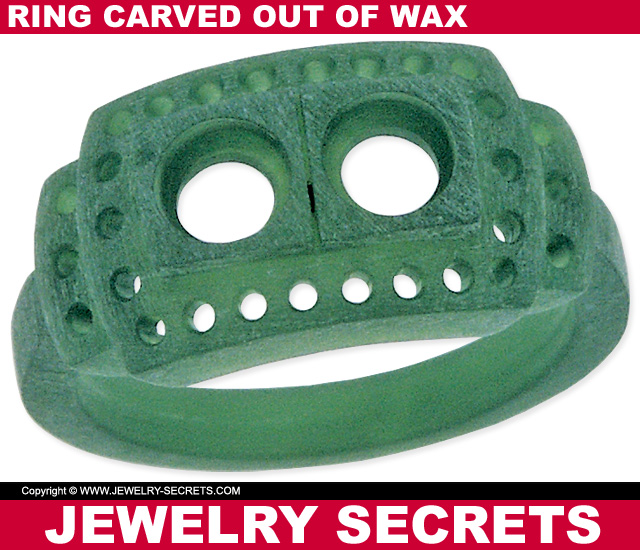
The ring shown above is a Gent’s ring. It may look funny being green (tell that to the Hulk), but carving out of wax is crucial for the entire lost-wax process to be accomplished.
Watch this video to learn more:
That’s a fun video that really shows you the time and effort needed to create even a simple design…
Once a wax is created (to fit the size of stones needed, and your finger size), the customer usually gets to view the finished wax (not always, but many jewelers advise this). That way if any changes are needed to be made (height, width, amount of stones, the way it fits and feels on the finger), it can be adjusted. It’s much easier to adjust a design in wax, then it is to adjust a cast metal piece.
If the wax gets approved, then it’s ready for casting.
3) Casting the wax
This is the time-endured lost-wax process. It’s literally encasing the wax in a plaster-like substance, burning the wax out, and leaving a void behind. Some jewelers do this in-house, others send it out to be casted. But the void is a hollow impression of your ring. Metal is then melted and poured into the gap (like filling an ice tray). Then it is cooled, solidified, and removed from the investment.

Watch the entire process here:
4) Setting the stones
As you saw in the above video, it’s a long process to set the stones in baskets, heads, gypsy mounted, tension; then sanding, filing, fitting everything together, putting in fine details, milgrain edging, finishing the metal with sandblasting, brushing, hammering, or polishing…
And Voila! The end result:

This is the time that the customer gets a call (usually 2-6 weeks from start to finish), and told the grand news. They’ll also learn the exact cost of the item.

So if you’re thinking about having a custom design made, DO SO! I highly recommend it.
Just do your homework first. Dig through catalogs, ring images, websites, browse to get ideas for what type of ring you’d like. Create something that’s entirely YOU!
Rose gold, yellow gold, white gold, platinum, silver… How about gemstones; Sapphires, Rubies, Emeralds, Citrine, Morganite? Diamonds? The sky’s the limit… Because when it comes to custom design, you can create anything!
Watch another custom ring creation process below:
Custom design is a very rewarding experience that gives you a one-of-a-kind piece; magical, mesmerizing, and highly personal, it is the ultimate work of art.
You end up with an statement piece that will get passed down from generation to generation.
Learn more with these great lost-wax carving books and casting tools.
Enjoy! :)
Recommended Jewelry Supplies: |
|||
 |
 |
 |
 |
 |
 |
 |
 |
 |
 |
 |
 |
Recommended Jewelry Supplies: |
|||
|
|
||
|
|
|
|
|
|
|
|
|
|
Recommended Diamond Vendors:

James Allen
James Allen is a leader in diamonds. Their real time interactive diamond inspection is the best in the industry. View and rotate any diamond under 20x magnification. Their prices, selection, lifetime warranty, 24/7 customer support and hassle free returns are unbeatable. Visit James Allen today.


Blue Nile
Blue Nile is the largest and most well known respected diamond dealer online. They are highly trusted, have a huge inventory, and low low prices (compare anywhere and see for yourself). If you want to save money, or build your own ring, this is the place to shop. Visit Blue Nile today.
