DIAMOND PLOTS & DIAMOND CLARITY
VIEWING CLARITY WITH DIAMOND PLOTS
This post contains affiliate links. If you use these links to buy something I may earn a commission. Thanks! As an Amazon Associate I also earn from qualifying purchases.
If there’s one thing I love doing more than anything it’s this: Looking at the Inclusions on a Diamond Plot and then trying to find those Inclusions in the Diamond under a microscope.
It’s exciting!
I may be a geek at heart when it comes to Clarity and Diamonds, but looking for and identifying those tiny, little imperfections is a very, very, cool thing.
It’s like a puzzle to me that needs to be solved.
So let’s jump into the gist of the plot…
What is a Diamond Plot?
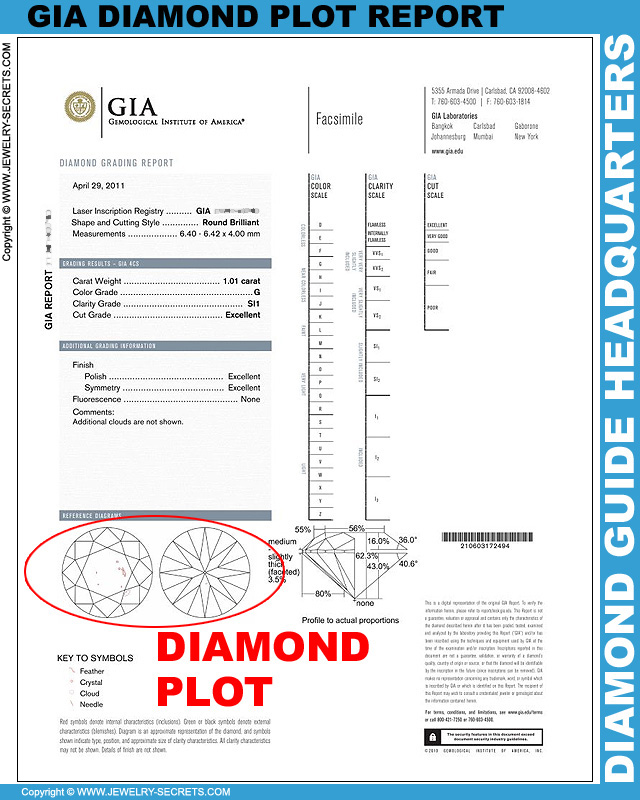
A Diamond Plot is a Diagram or Drawing of the Inclusions inside a Diamond and also those on the surface of a Diamond (called Blemishes).
Take a look at where a Diamond Plot is displayed on a GIA Diamond Certificate…
The Plot is basically the fingerprint of that particular Diamond. Every single Diamond is different and every single Plot is different! Everything born in nature is 100% unique! :)
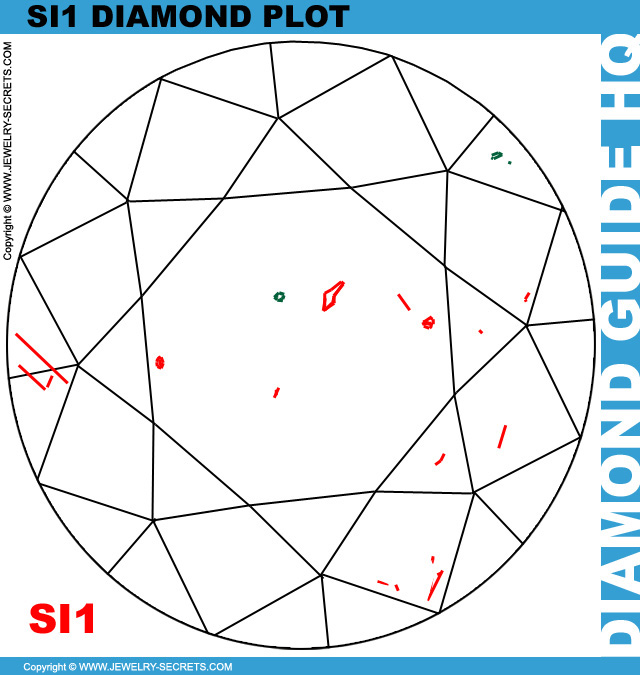
The Plot Diagram will show red marks indicating Flaws inside of the stone, and green marks that indicate flaws on the outside of the stone (surface).
Take a close up look at a real Diamond Plot below…
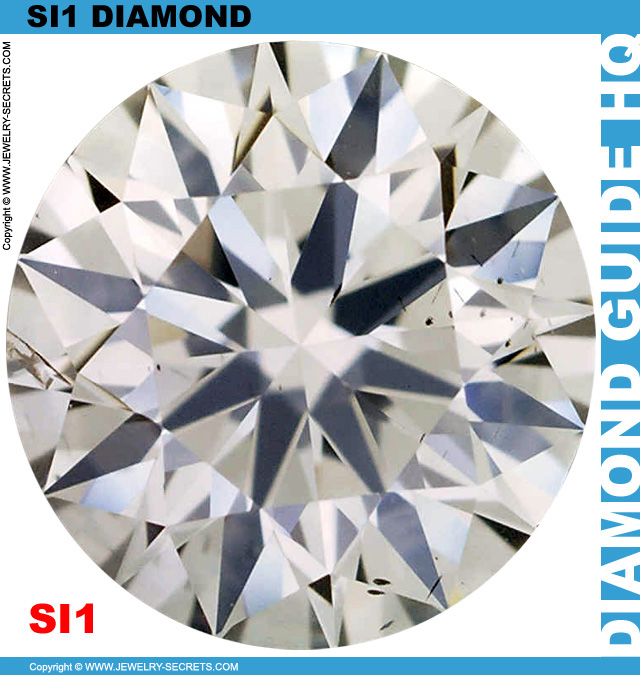
Now take a look at the actual Diamond under 10x magnification…
Incredible to look at! The information for this particular Diamond is below…
| CARAT WEIGHT, CLARITY, COLOR, CUT, CERTIFIED | PRICE | VIEW |
| 1.01, SI1, F, PREMIUM, GIA | $7,850 | VIEW |
The less Flaws and Imperfections on the Plot, the cleaner the stone becomes and the better the Clarity is. This also makes it more expensive! :)
Plots like this are listed on GIA’s Full Diamond Report (they aren’t shown on the smaller Dossier Diamond Reports).
The Plots show not only Flaws in the Diamond that are visible to the naked eye, but also those that are only microscopic under 10x magnification.
GIA and AGS are both the tops in the industry when it comes to grading Diamonds and giving accurate Diamond information, so I would highly recommend buying one or the other.
If you look, you’ll see that there are actually TWO Plots shown on the Reports. It shows the face up position (looking directly down into the Diamond), and it also shows the bottom view (staring directly into the point, or Culet of the Diamond). See image below showing both top and bottom views…
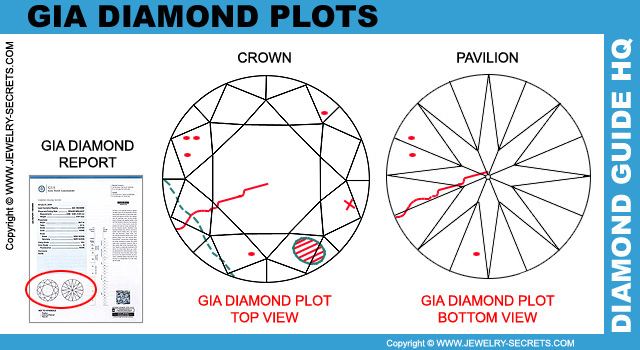
These 2 views are important because sometimes Inclusions fall more towards the bottom of the stone and are easier to see through the Pavilion…
Now that you see what a Plot is, the real question is:
How do you Read a Plot?
Reading a Diamond Plot is Easy… Once you know what all the little Plotting Symbols and Marks mean. There are 15 Internal Characteristics that can be shown on the Plot, and 9 External Characteristics that can be listed as well.
Keep in mind, these Symbols are just a way of tracking and identifying the Flaws in a Diamond. They may not look exactly like you see on this Chart, but the design and patterns should be the same.
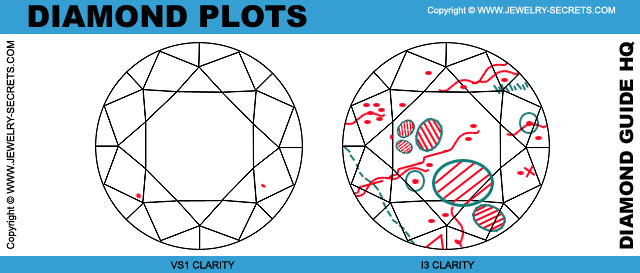
Some Diamonds of higher Clarity will have just a couple of these listed on the entire Plot. Others will have tons of red marks and green marks scattered around the diagram. Some look like a huge scrambled jigsaw puzzle.
Compare a VS1 Diamond Plot to an I3 Diamond Plot below…
HUGE DIFFERENCE!
Diamond Plotting Symbols
Let’s take a look at the Plotting Symbols that GIA uses to grade and evaluate Diamonds with…
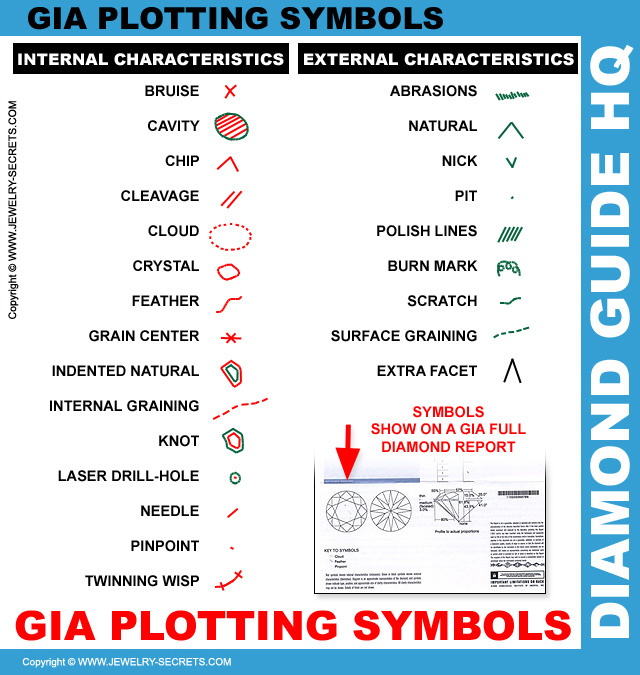
As you can see the Plotting Symbols are:
Internal Characteristics
|
External Characteristics
|
Now it all starts to make sense… That little Green V on the side of the Plot means there’s a Nick on the Girdle! :) A tiny red dot means there’s a Pinpoint in the stone. A red dot with a green circle around it means that the Diamond has been Laser Drilled and has a Drill Hole in the stone (which also means the Diamond has been Clarity enhanced).
Kind of interesting, eh?
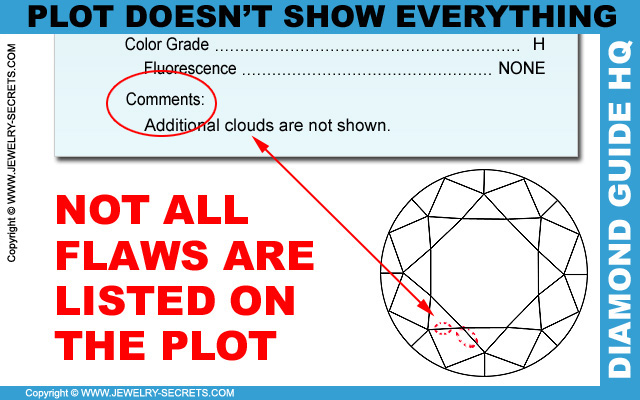
One thing that you may find fascinating is this fact: Not all the Flaws may be shown on the Diamond Plot.
Sometimes when there are multiple Pinpoints, Clouds or some other imperfection in a given area, not all of them are logged. It gets pretty redundant trying to put each and every one so close together. It’s like trying to map out each and every freckle on a face…
Plus, there are some Flaws and Characteristics that don’t show on the plot at all. Flaws like Naturals, Internal Drilling, Bearded Girdles, Lizard Skin, Etch Channels, and Natural Radiation Stains.
The Flaws not listed on the diagram will often be listed under additional Comments on the Diamond Report as in the example below…
Compare the Plot to the Diamond
First off, never buy a Diamond based solely upon the Inclusions listed on a Plot. A Plot has no way of showing you how much sparkle a Diamond has, or how truly beautiful a Diamond can be. You must look at the other traits of the Diamond like: Cut, Color and Carat Weight to make a well rounded decision.
Now, looking at the Plot of a Diamond is cool, as you can see how many Flaws are in the stone, but it really doesn’t mean much until you actually see the Flaws in the actual Diamond yourself.
Seeing is believing!
To compare Clarities and Inclusions from a Plot to the real stone, you’ll need a 10x Microscope.
10x Powered Microscopes
10x means ten powered (magnified 10 times). This is the kind of professional microscope that Jewelers use to View, Classify, Scrutinize, and Grade Diamonds with. It’s also what Certification companies use to grade stones with (like GIA).
ALL Diamonds are graded under 10x power. This standard is what is used to mark all those flaws that you see on the Diamond Plot.
You can view Diamonds at higher magnification if you want to study the Inclusions closer. But keep in mind, any new flaws that may show up under the higher magnification (20x or 30x) are not considered flaws unless they are seen under 10x power.
Only 10x flaws are listed, documented and graded.
So once you have the Diamond securely held with tweezers (Locking Diamond Tweezers are the best), you can now view it under a scope to see the real flaws.
It may take you a while to get used to viewing objects at this magnification. Just peering through those separate black eye tubes is difficult as it is, let alone trying to focus on microscopic details… Remember 7th Grade Science Class?
Plus, remember that you are only focused on one particular focal length in the Diamond. Not all of the Diamond will be crisp and clean and in focus at the same time.
You’ll need to adjust the knobs of the microscope slightly up or down to pinpoint different portions of the stone.
This is the only way you’ll see all the flaws in a Diamond, and chances are, you’ll have to rotate the Diamond with a side view (the salesperson can do this for you – you have to be careful you don’t chip the edge of the Diamond with the tweezers), to see all the items listed on the Plot.
You won’t see all the Flaws
I’ll guarantee you one thing, 99% of all the people will never see all of the flaws listed on a report. Heck, even in these magnified examples above of real stones you can’t see them all. That’s because a lot of these flaws are really minor and will look white or clear in the stone, or even turned sideways which masks their appearance. Some are just about invisible. Only experts with years of practice and training will be able to spot all of them. And even then, they will probably have to look long and hard to do it.
Some Clarities are easier to spot the Inclusions in. Clarities of SI1, SI2, I1, I2 and I3 are the easiest for customers to view because they can see those flaws.
Higher quality stones like VVS or VS Clarity get very difficult to spot the flaws in. To most untrained eyes, these Diamonds will look pretty perfect, even though they aren’t.
Take a look at the VS1 Clarity Diamond below…
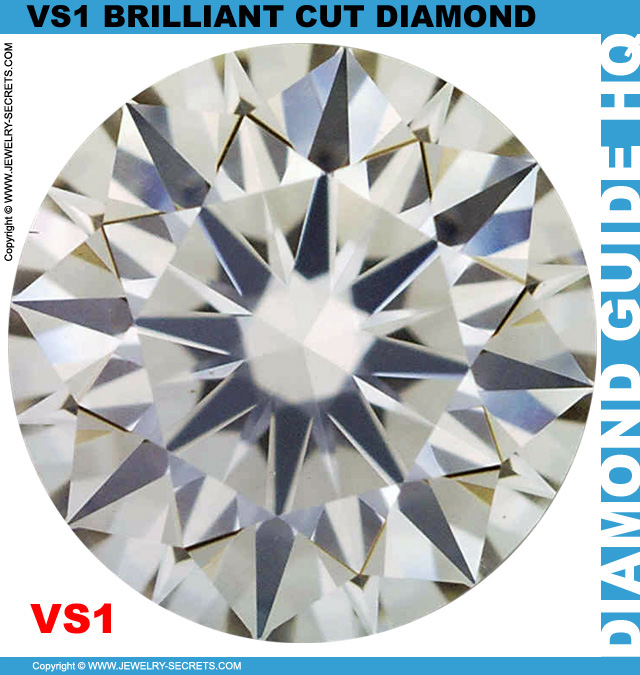
Do you see the Flaws? There are just a couple and they are not easy to spot. This VS Diamond is very impressive (that’s why I LOVE VS Diamonds!).
Now take a look at the actual Diamond Plot.
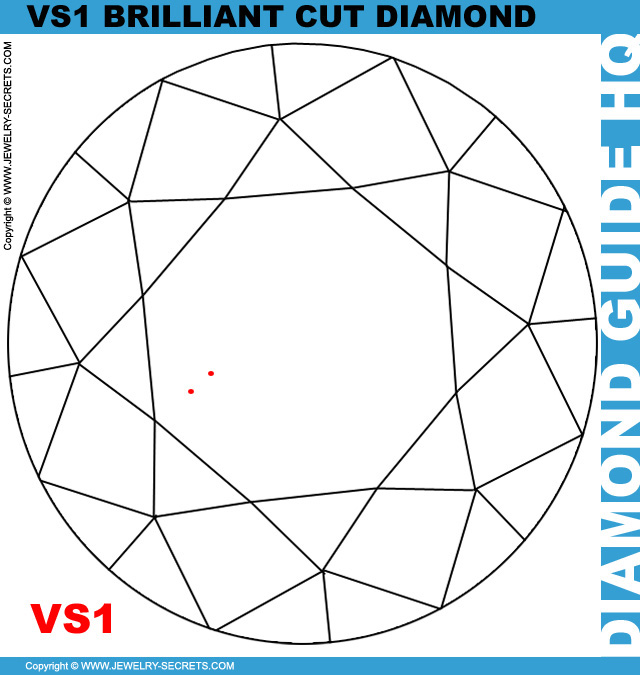
See those 2 Pinpoints in the Diamond? Those are the only two noticeable flaws in the stone. What a great looking Diamond (who ever purchases this Diamond will get a great looking stone).
Rotate the Diamond
One thing you should do when viewing flaws under a scope is to line them up with the Plot itself. Adjust the stone so that the flaws are in the same position as those on the Plot. The best way to do this is to look for the largest flaw first. Find that flaw and match it up to the Plot. If there is a huge Cavity at the 2 o’clock position, rotate the stone so that both views are identical.
This will make it easier to pinpoint and spot all the other smaller flaws and imperfections in the stone.
It should help identifying the marks a piece of cake. :)
Compare a Real Plot to a Real Diamond
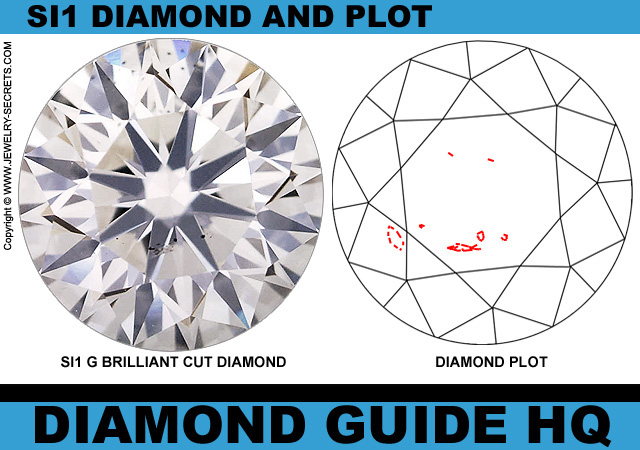
Let’s take a look at Real Diamonds and real Diamond Plots (These images are taken from James Allen).
In this first exampe, you’ll see a an SI1 Clarity Diamond (the most popular Clarity), and G Color (one of the most popular Colors).
The actual GIA Full Diamond Certificate for this Diamond is at the very beginning of this post! :)
It really starts to click when you can view the stone side by side with the actual Plot. I told you it was a very cool thing…
Here’s the rest of this Diamond’s information…
| CARAT WEIGHT, CLARITY, COLOR, CUT, CERTIFIED | PRICE | VIEW |
| 1.01, SI1, G, IDEAL, GIA | $7,960 | VIEW |
When you can see the Diamond and then see the flaws on the Plot (or at least most of them), it really tells you a lot about the Clarity and Grading.
Compare a couple of more Diamonds to their real Diamond Plots…
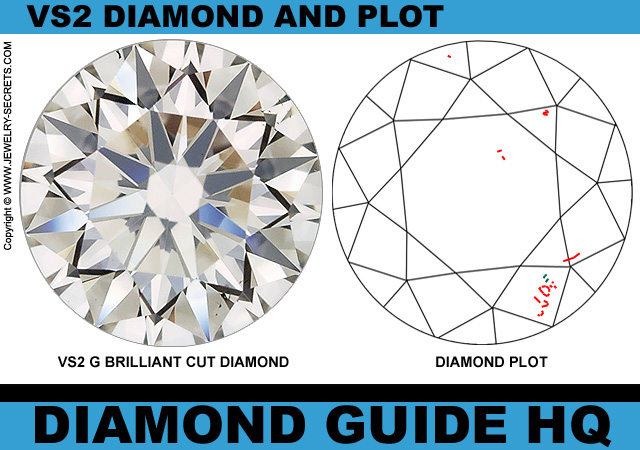
VS2 Clarity Diamond
Here is a VS2 Clarity Diamond and the actual Diamond Plot…
Here’s the rest of this Diamond’s quality and price…
| CARAT WEIGHT, CLARITY, COLOR, CUT, CERTIFIED | PRICE | VIEW |
| 1.01, VS2, G, IDEAL, GIA | $9,310 | VIEW |
SI2 Clarity Diamond
Next up, let’s take a look at an SI2 Diamond… SI2’s really start to increase as far as Inclusion size and frequency is concerned…
But at least one good thing about going lower in Clarity… The price gets lower as well. :)
| CARAT WEIGHT, CLARITY, COLOR, CUT, CERTIFIED | PRICE | VIEW |
| 1.07, SI2, G, IDEAL, GIA | $7,270 | VIEW |
Now for the fun part…
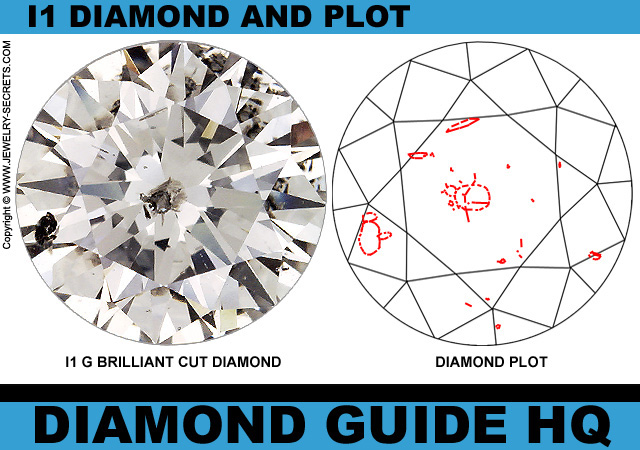
I1 Clarity Diamond
This is the real eye opener… If you haven’t seen an I1 Clarity Diamond yet, hold onto your seat. The Flaws get large and very obvious (even to your naked eye – no Jeweler’s Loupe needed).
As you can see in this stone, the flaws get reflected and mirrored around the stone like a fun house effect. It makes a lower Clarity Diamond look like it has a lot more Inclusions than it does.
Check out the Diamond and Price below…
| CARAT WEIGHT, CLARITY, COLOR, CUT, CERTIFIED | PRICE | VIEW |
| 1.01, I1, G, PREMIUM, GIA | $4,170 | VIEW |
Prevent Diamond Switching
The great thing about having a Diamond that’s Certified with an actual Diamond Plot listed on the report (not all Certificates have these), is that it will help you identify your Diamond.
You can memorize the flaws in your stone. They will never grow, shrink, change, or enlarge… They are constant and forever.
Any day, any year, you’ll be able to view your Diamond under a microscope, see your flaws, compare them to your Diamond Plot and know that the Diamond is yours!
This is the Best Way to Prevent Diamond Switching!
When you drop your ring off at the Jewelry Store for Polishing, Sizing, Prong Repairs, Stone Tightenings… Scope your Diamond. Scope it again when you pick your ring back up…
THIS IS A MUST!!!
That way you’ll know if your Diamond was switched. You must do this before you leave the store. Check it out. It’s peace of mind and it only takes a couple of minutes.
I highly recommend it.
In fact, I recommend you do it today!
Go to a local Jewelry Store. Take your Certificate with you. View your flaws under a microscope. Find the Inclusions on the diagram. Also check the Comments section to see if there’s any extras that you may need to know.
Microscopic Flaws are fascinating and a world that’s just waiting to be discovered.
To truly appreciate the full beauty of a Diamond, you have to take a closer look…
And this is where the Plot thickens! :)
















Leave a comment