VIEW YOUR DIAMOND FROM THE SIDE
VIEWING YOUR STONE FROM THE SIDE SHOWS MANY THINGS
This post contains affiliate links. If you use these links to buy something I may earn a commission. Thanks! As an Amazon Associate I also earn from qualifying purchases.

A lot of people already know that you should view a diamond under a microscope or a 10x jeweler’s loupe (ten times magnification) before you buy it.
If not, I’m telling you now.
Viewing the diamond will allow you to see what’s inside the stone. You get to view the flaws and inclusions that are microscopic, and you also get to see eye-visible inclusions easier and with more detail.
You can compare these imperfections to the flaws on a diamond plot.
Seeing them closeup makes you appreciate a diamond’s beauty and the way that clarity works and why they are graded the way they are.
All this by seeing flaws with your very own eyes.
But, you shouldn’t stop here…
There is so much more than meets the eye.
To see these characteristics, you need to change your perspective and your point of view. Literally!
Change the angle and position of the diamond you’re viewing and look at the diamond from the side.
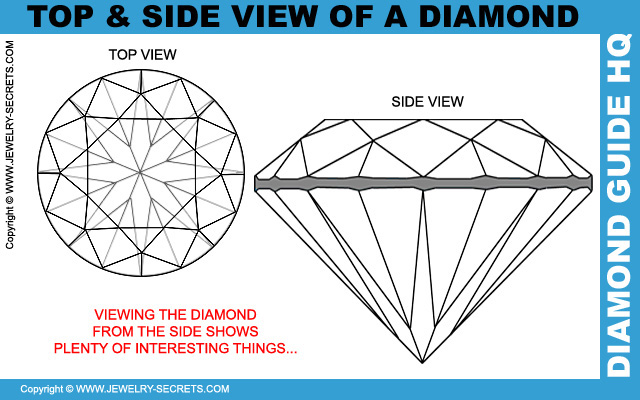
Viewing a diamond from a side view opens up traits that you wouldn’t see from a normal top-down position.
Things like:
- Inclusions
- Chips or Cracks
- Girdle Size and Consistency
- Laser Inscriptions
- Proportions, Angles, Depth and Extra Facets
Let’s take a closer look at these…
1) Inclusions:
A lot of inclusions can be hidden or missed from a top view. Many times facets and sparkle mask these flaws and you’ll never see them unless you view the stone from a side view.
Many times you’ll see small black spots in a top-down view (peering at the diamond through the table) that looks minute and harmless enough. But viewing the diamond from a side view shows you that the inclusion runs deep, and may be noticeable, and also could make the stone weak and vulnerable.
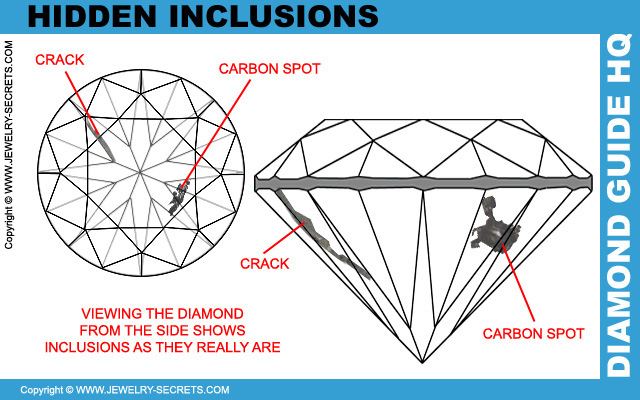
View the stone from the top to see what you can see, and then view it from the side under a scope to see more.
2) Chips and Cracks:
Often a diamond can get chipped, nicked or cracked on the side of the stone. I clarity diamonds are known for this. And the spot that gets these flaws the most is the side of the stone, or the girdle area. Many times people may never see these faulty lines because they never view the stone from the side.
See image above of a deep crack that almost doesn’t show up from the top view…
View a stone all around the girdle and underneath the girdle as well to see if any chips or cracks are apparent.
Damage like this could be done at any time. It could easily be done by you just by hitting your ring against a filing cabinet (be careful). You just never know. It’s always wise to check…
3) Girdle Size and Consistency:
And while you’re looking around the girdle area, make sure you look at the shape, size and consistency of the girdle as well.
The diamond girdle is the outer edge of your diamond that runs all the way around the diameter of the stone like a belt.
It’s what the prongs grip and wrap around to hold your stone in the mounting.
The girdle should be even all the way around. Like so…
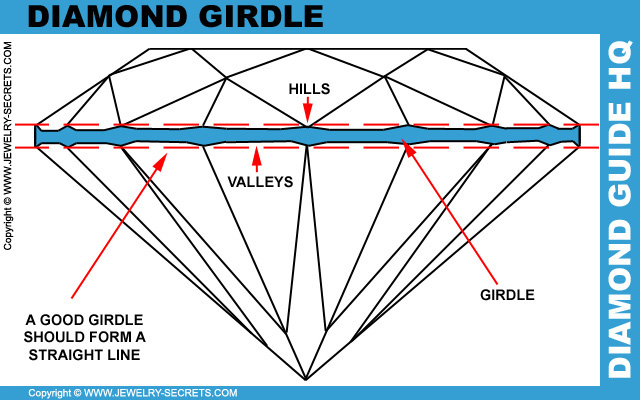
The hills and valleys should be similar and consistent and make a pleasing even line. Many times you can instantly tell if a diamond is cut well, just by glancing at the girdle.
If the girdle is wavy, uneven, jagged or bumpy, it may be a sign that the rest of the cut may be off.
A great girdle to have is a thin-medium girdle (listed on a diamond report). Nothing too thick or nothing that would stand out like an eye-sore.
Whether your girdle is faceted, polished, or rough doesn’t really matter much (although I do dislike a rough edged girdle).
What matters is the overall consistency and appearance.
4) Laser Inscriptions:
If your stone is laser inscribed, it will show this inscription right on the diamond girdle itself…
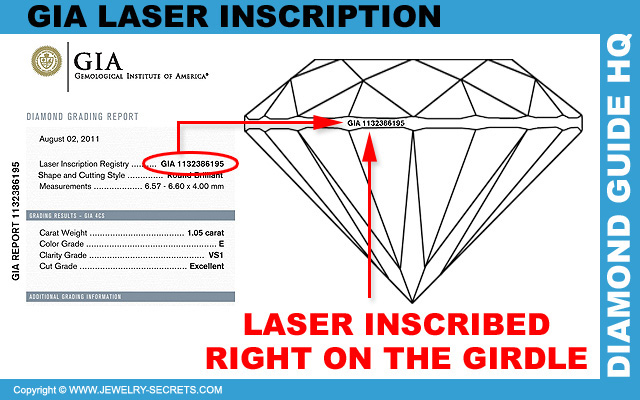
This number should match the number on your diamond report or certificate. That way you know if the diamond you’re looking at is the actual diamond listed on the report.
This is very important!
View this inscription when you drop your ring off at the jeweler, view it again when you pick it back up (scope it at the jewelry store).
This way you’ll know for sure that the store didn’t switch your diamond, and that the diamond you left with is the same stone you started with.
5) Proportions, Angles, Depth and Extra Facets:
Now take a look at the overall proportions of the stone from the side view. Do you see that line that cuts across the pavilion (base of the diamond)?
That’s light reflecting into the stone, bouncing across, and coming back out to the viewer in a splash of brilliance, fire and scintillation (sparkle).
That line should reflect across in a straight line (not slanted)…
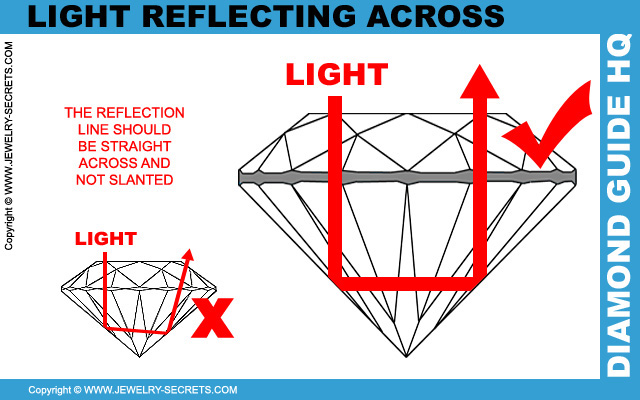
This will tell you if your diamond is cut well, or losing light and life.
The table will tell!
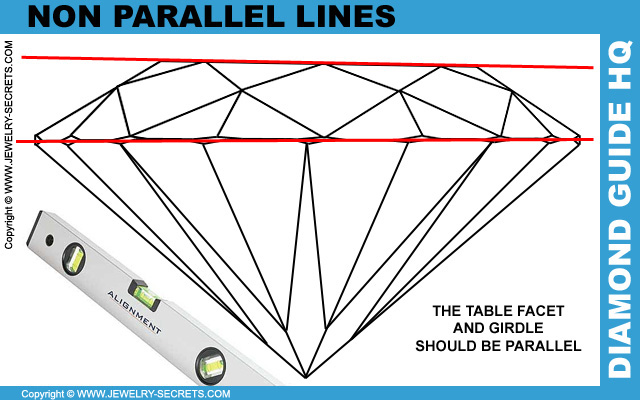
Also look at the top flat table facet along with the girdle. They should both be perpendicular to each other. Are they straight? Are they uneven?
If the diamond is cut like it should, those lines should be parallel.
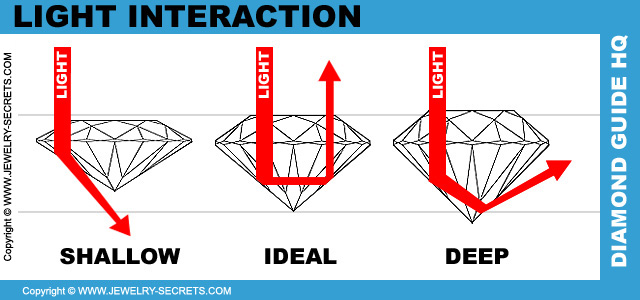
From a side view, you’ll also be able to tell if your diamond looks chunky or lumpy. A diamond cut too shallow or too deep loses light and sparkle.
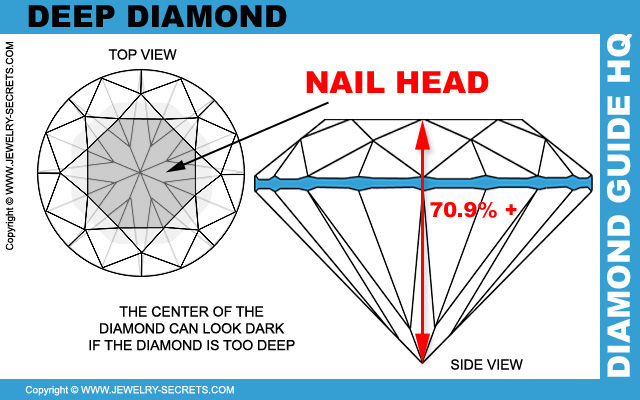
Stones that are too deep will appear darker in the center of the stone. This effect is often referred to as a “nail head“, because from the top down view you’ll see dark shadows straight down under the table…
Extra Facets:
Lastly, look for extra facets that may appear under the girdle. Diamond cutters put extra facets on some diamonds for a couple of reasons: 1) To remove unsightly inclusions or blemishes. 2) To smooth out poor cuts of stone.
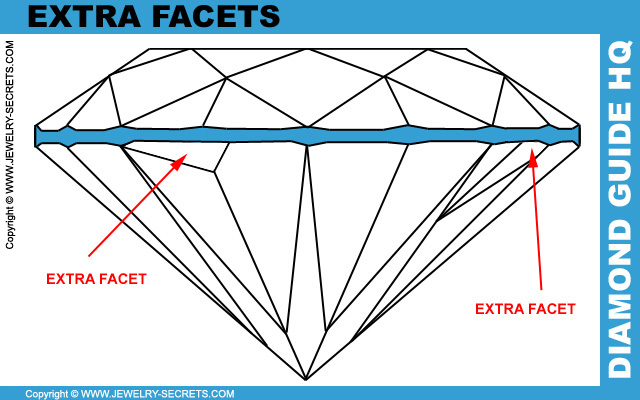
If a flaw falls right on the outside surface of a stone, it’s wise for the cutters to remove a little bit more of the diamond in that area, which also removes the flaw.
By removing the flaw, the diamond will look better, be cleaner, and get a better clarity grade… And not affect the overall quality of the stone much.
But if the cut of the diamond is fair or poor, extra facets on the girdle should raise a red flag. Especially if there are more than one extra facet (as in the image above).
When you see this, it’s a good indication that they are trying to cover up bad proportions and make other facets meet up.
Extra is not bad, unless it’s too much. :)
The Final Word:
You can learn a ton by changing your view point. Who knew a side view could teach you so much about diamond clarity and cut?
P.S. Also seeing the true color of your diamond is also much easier when you view the diamond from the side. Read my post about viewing diamond color here.
Cheers! :)














Leave a comment